Stella McCartney “tribute”
This project was a little different to the others, in as much as I had the idea for what I wanted to make first, and then set out to find suitable cast off garments to cut up. Normally it’s the other way around.
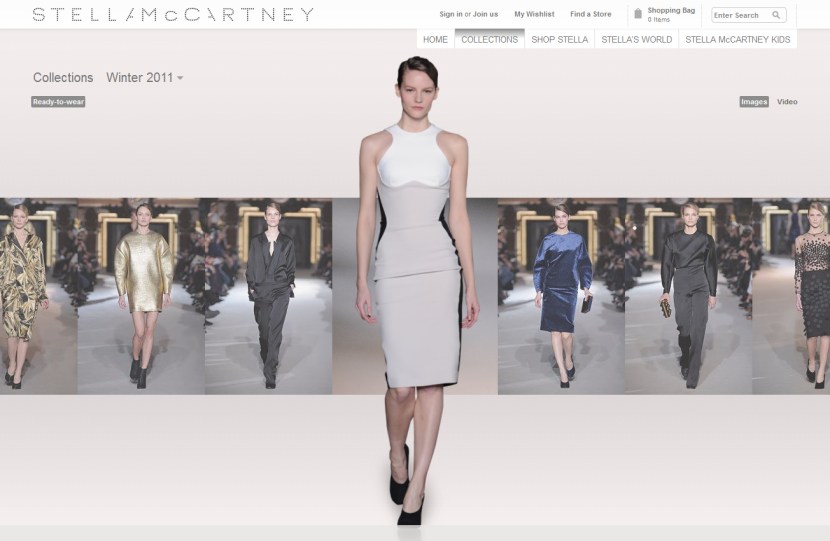
Now, I’m a big Stella McCartney fan, and I’m also a fan of Nicole Scherzinger’s style, so imagine my delight when I saw the cover of last month’s InStyle:
It’s Nicole Scherzinger rocking Stella McCartney Winter 2011!
Obviously a “tribute” to this dress went straight to the top of the list of future projects. I know Ms McCartney probably uses only the finest, heaviest, drapiest 100% cotton jersey that’s hand dyed by silkworms in Nicaragua or something, but I had a different raw material in mind. Yes, that’s right, charity shop men’s T-shirts.
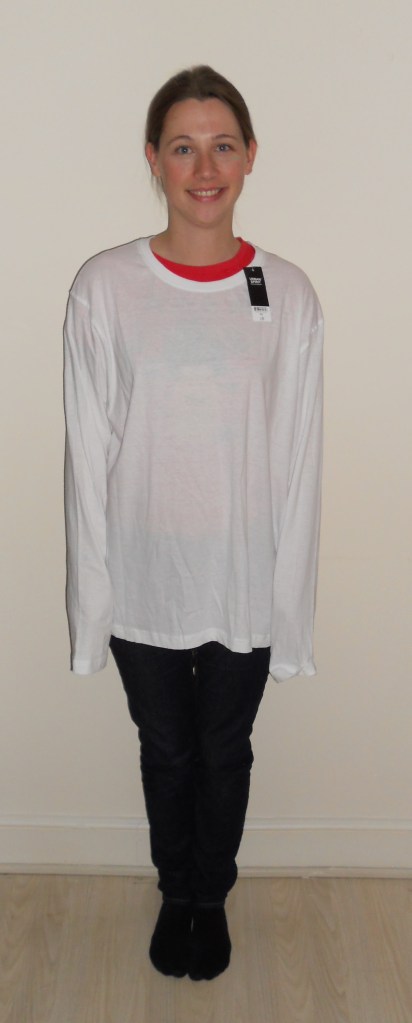
It didn’t take long to find suitable black and white T-shirts, but the plain beige one was a lot harder to come by. I eventually got all three from the British Heart Foundation shop in Gravesend. The black one (as new) was £1.99, the white one (still new with tags) was £1.99 and the beige one was £1.50.
Now, the beige T-shirt had some issues. It wasn’t as big as the black one, and the material was much thinner. It was worn, in places to the point of bobbly, and very very stretched. It also had a stain on the front which I only noticed once I got it home… typical!
As a first thought, what does the back of the “inspiration” dress look like? It could be literally anything! Isn’t it funny how you hardly ever see the back of designer dresses? Catwalk and magazine pictures usually only show the front. My initial thought was that the black was a symmetrical stripe down the side, so that the optical illusion at the waist happens both front and back. I was wrong – in the magazine it shows Nicole in another pose where you can clearly see the back of the dress is all black.
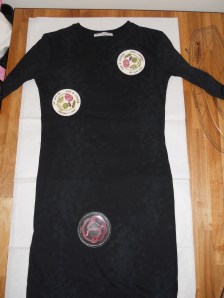
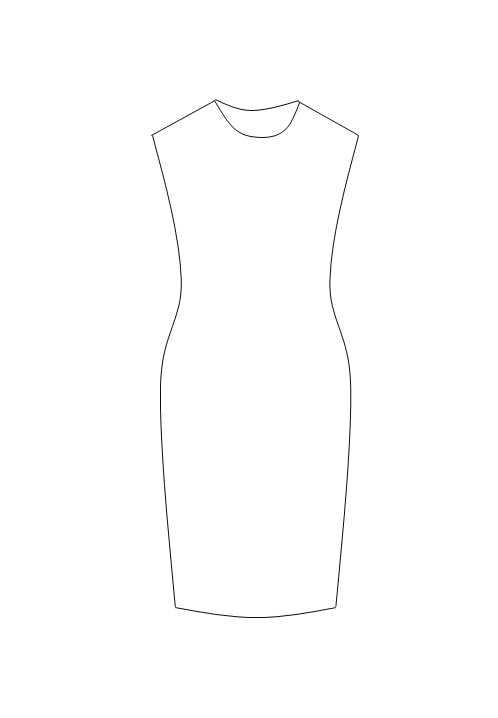
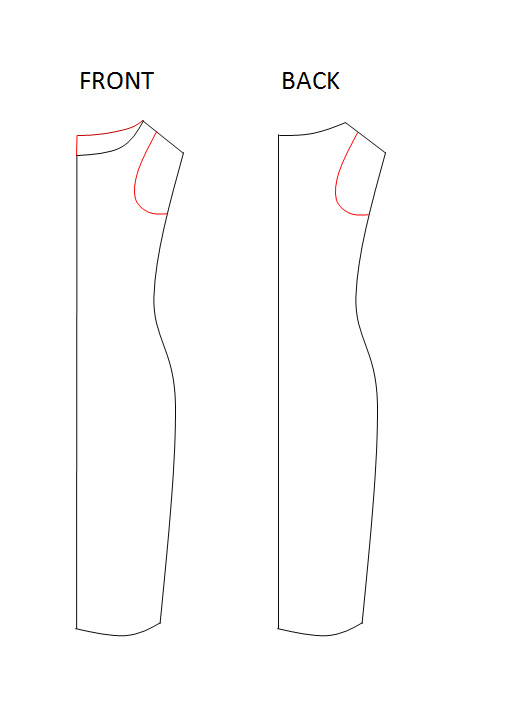
To make a pattern for this dress I used a jersey dress that I already own and like the fit of as a template. I literally used paperweights and drew around it (not the sleeves) on pattern paper to make a sort of jersey dress block. I folded the paper in half down the centre to check that both sides were approximately the same and then traced it off twice, once with the front neckline and once with the back neckline.
Here are the steps I used to create my pattern.
I started with my “block”:
The first thing was to draw in the desired necklines and racerback style armholes, shown in red below.
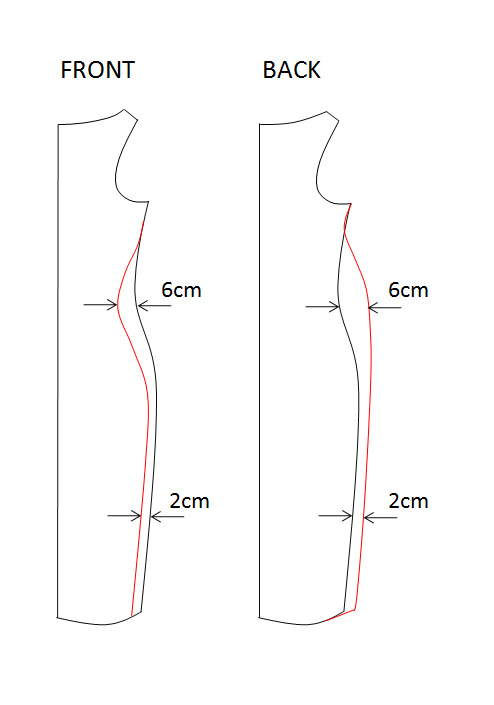
Next, I estimated how much black was visible from the front at the waistline. I came up with 6cm by holding the tape measure against my body while looking in the mirror! I also noticed that on the magazine cover, you can just about see a bit of black each side of the skirt. I estimated there was probably about 2cm of black visible on each side of the skirt. You can see on the diagram below that I drew a new side seam on the front piece by removing 2cm from the skirt, taking out 6cm at the waist, and tapering to zero at the armhole. I did the exact reverse on the back. I added 2cm to the skirt, added 6cm at the waist and tapered to zero at the armhole.
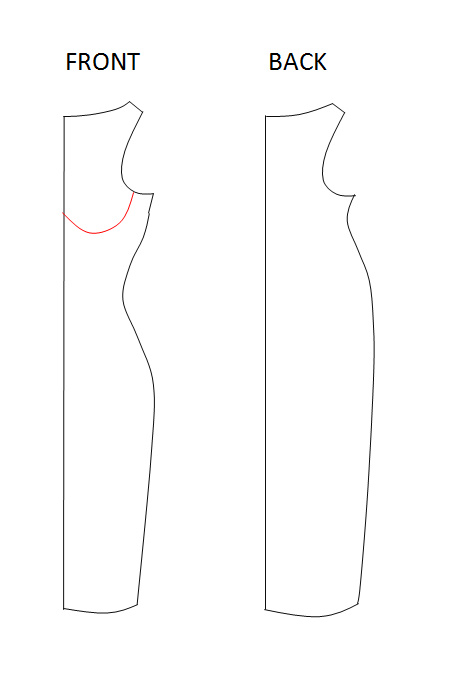
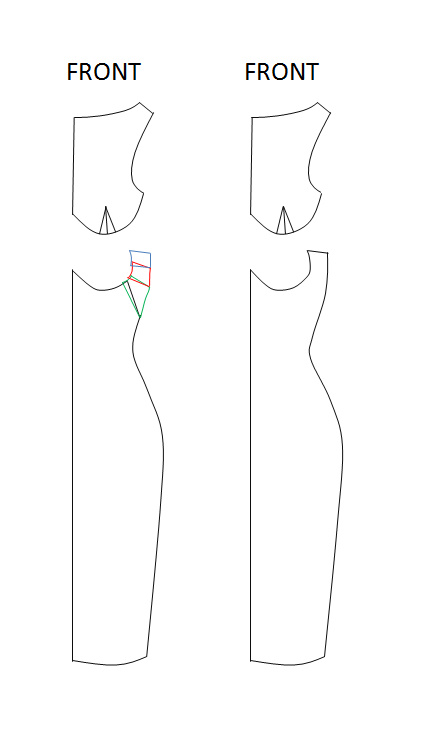
The next part involved doing some work on the front. I used body measurements for the shoulder-to-bust and shoulder-to-underbust and marked these on the pattern. I also measured down the centre front from the neckline to find a suitable point for the high point of the curve. I joined the points, drawing a curve by hand which I thought looked something like the original dress in the picture, shown in red below, and cut along it.
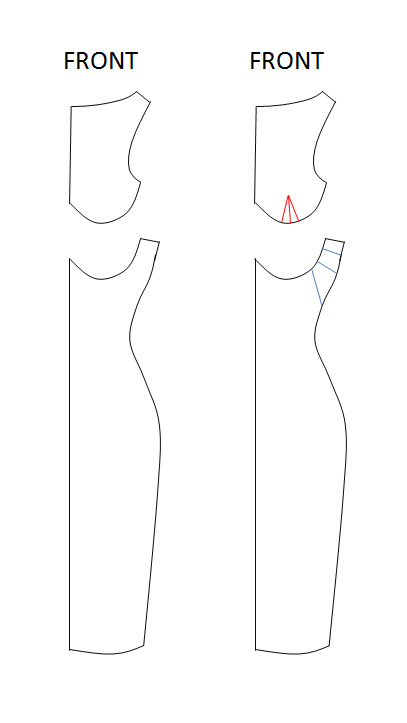
Now, the tricky part. It’s clear from the photos that the designer dress has a dart in the white piece to make the underbust more fitted, but there’s no corresponding dart on the beige piece. It was easy enough to mark a 2cm dart on the white piece by draping it on my body (red lines below). The tricky part was taking out 2cm of length from the beige curve without adding a dart. I slashed and spreaded it (blue lines below).
Actually, because I wanted to reduce the length of the curve, I did the opposite of spreading it. I overlapped the pieces by 6.60mm each (OK, just 6mm – I was working with sticky tape for chrissakes) to make up the 2cm reduction I wanted. I tried to show this with the green, red and blue lines below (click the picture to enlarge).
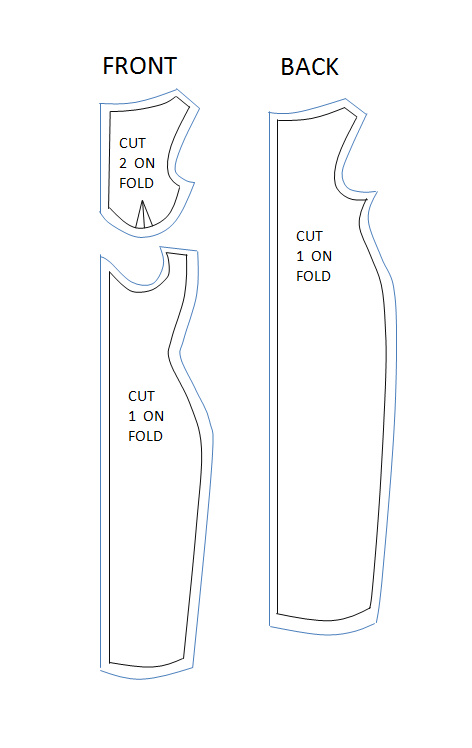
All that was left to do was to mark the seam allowances on and, ta da! Pattern pieces.
I cut 2 pieces of the white, so one could be used as a facing for the arm and neck holes, and also to help get rid of any transparency (it was quite thin!).
Not shown above, I also cut a facing for the back neckline and armholes to be used in a similar way.
Here’s what the pieces looked like before I overlocked them together.
You can see that the beige and black pieces are pieced. On the beige, there is a seam across the skirt and there is also what’s left of the shoulder seams just under the underarms. The black piece has two seams across – one at roughly the same level as the skirt seam on the beige (but not the exact same) and one between the armholes. Unfortunately this is what happens when you work with recycled materials!
I overlocked the white to the beige and was pretty happy with it.
Next I pinned and overlocked the side seams and tried it on to see if the fit was working. It was, but the front armhole was gaping on both sides. I ended up taking 1cm out of the white/beige seam at the underarm to help. All that was left once the fitting was done was to tidy the beige portion of the armholes by hand and make a hem using the twin needle on my machine.
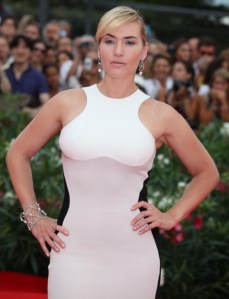
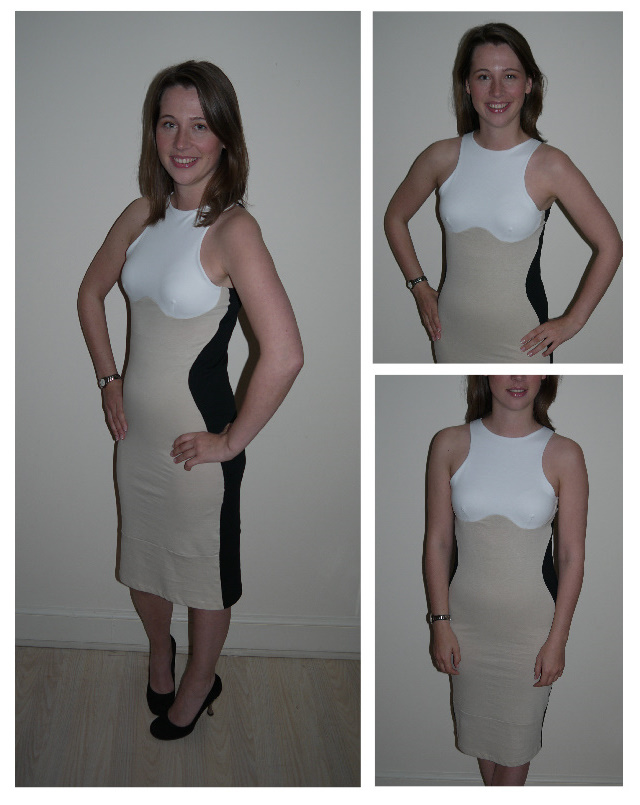
Here’s how the finished dress turned out.
Ooops! My bad. That’s Kate Winslet modelling the dress at the Venice Film Festival.
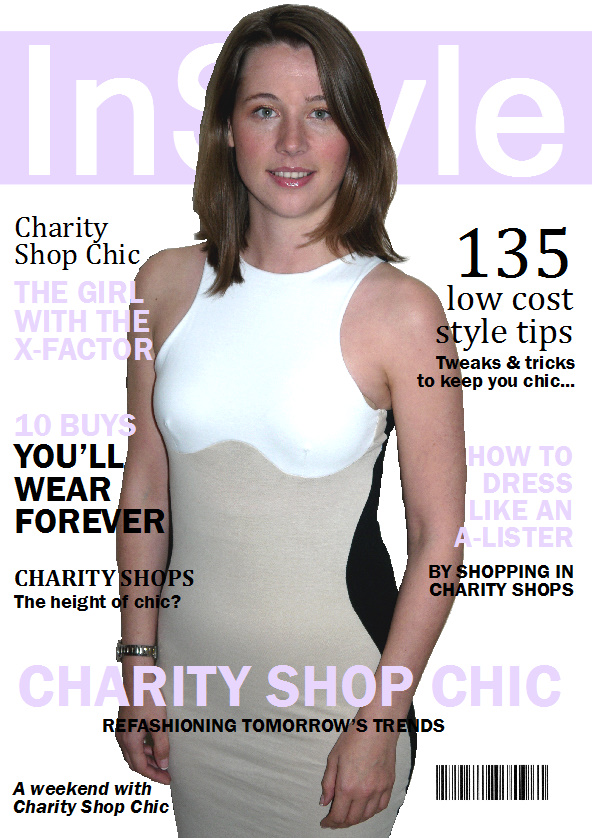
This is me really…








THAT LOOKS AMAZING!!!!! great job! i had read an article about how much celebs are loving those dresses!!! yours looks perfect! i had been wondering when you were going to post again… i got really excited when i recieved an email saying you posted! keep up the great work!
Ha, thanks! I keep seeing more celebs wearing this dress, if only I had some red carpet events to go to so I can show mine off :-)
you are gorgeous and so is the dress! fantastic job!!
How kind of you, thank you!
Wow! I just saw this on the Re-Fashion Co-op and I had to click over to tell you how AMAZING this is. You have an amazing skill!
Right…off to have a good nosey around the rest of your blog – yeay!
Aw, thanks very much, really happy that you like the dress. Enjoy the rest of my ramblings :-)
Fantastic work, I’m really impressed!
Thanks! And thanks for stopping by!
Oh wow, this is fantastic!
You’ve done an brilliant job, and I love your step by step instructions.
Thanks! Glad you found the detailed breakdown useful… will you make one of these yourself?
Great job as usual. Did you ever study sewing or design in high school or college? You seem to have a real flair for this. I took a home ec course in high school and my sewing skills are great as long as I use a pattern, Vogue being my fav. Great job again, love your detailed exlanations. I’m from Montreal, Canada and in the U.K you guys have the best charity shops!
Hi Josephine, no I’ve never formally studied sewing or design although I did take a basic pattern making course once, not that I was terribly impressed by it. I do have a number of good books on the subject and I also get inspiration from many of the wonderful blogs out there! I’m pleased you found the level of explanation useful, hope it inspires you to make something like this!
Very nice. You’ve got a nice body to begin with, but the design really does something good for the shape.
Thanks! :)
I don’t know if I would attempt anything like this myself, even with your instructions!
Can you recommend any of the books you use?
Also, do you use a dress form? I’m toying with the idea of getting one but they’re so expensive, but if you’ve done this, which is so fitted without one then I probably won’t bother.
Hi, I can recommend “Metric Pattern Cutting” by Winifred Aldrich for the basics (I have the older version with the dark red cover), it’s a really comprehensive book which will give you a good idea of where to start. I also love “Pattern Magic” and “Pattern Magic 2” by Tomoko Nakamichi, totally inspirational books but I would say they are a bit more advanced. I love Burda and subscribe to the magazine – it has so many patterns in it every month that can be used as a starting point and be tweaked or adapted.
I do have a dressform and I use it a lot, but I didn’t use it for this particular project. It’s not 100% necessary, but if you do decide it would be useful you can sometimes get them cheaply on ebay.
Hope that helps!
Absolutely amazing! I’m in awe of your ability to make up a pattern like that, especially in jersey. And it looks fantastic!
Thanks for the kind comment! :-)
WOW!!!!! That looks GREAT!!!! Really good job!!! I wish i could be that good! :-)
Hi from Germany
Aw, thank you! :-) Glad you like the dress.
It looks fantastic!!!!!!!!! YOu don’t have anything to envy Kate Winslet, you look gorgeous in this dress, that was made by you! YOu have great skills and this dress proves it. Beautiful work, it looks as good (or better taking into account your raw materials) than the Stella MacCartney piece!!!!!!!
Such a kind comment, thank you. I think even Stella herself would have struggled with that beige T shirt ;-)
really great job. It’s good to see your pattern making stages! Looks great! One of the best refashions that I have seen:) Love the refashion of the mag cover too!
Thank you Mahaila, I am glad you found the step-by-step useful. And yes, I had a lot of fun with that magazine cover :-)
This dress looks great! Love the detailed explanation and patterns. May have to give it a go myself!! Keep up the good work – looking forward to more …!
Definitely do! And post some pictures! I would love to see other people’s take on this dress.
Wow! Fabulous job! I was starting to go cross eyed reading how you figured it all out and put it together, you certainly have some patience and determination there my girl! Looks great on you too, really well done.
Yes it was a bit of an epic post… thanks for stopping by though!
I meant crosseyed in a good way! There is no way I could stick it out through all of that figuring out, I would have given up and put it i the too hard basket! Love your blog!
xx
Hehe :-)
Your refashion is fabulous!
Thank you so much :-)
Lol, love the Instyle cover
Ha, thanks, I had a lot of fun making that :-)
Your dress is amazing and you look gorgeous in it! How clever!
Hey thanks for the kind comment!
perfect! You’re a genius in refashion as always! The Instyle cover of you is so cute!
love,mongs
mythriftycloset.blogspot.com
Thanks Mongs :-) The cover was just a bit of fun!
Ingenius! And what a great sense of humor.
Thank you Kitty! :-)
Bravo! Encore, encore!
Merci!
amazing!!!
Thank you :)
Another awesome creation! I love that you see so much potential in other peoples cast offs at the Charity Shop.
Congrats on another beautiful dress that definitely deserves to be shown on the red carpet!
Becky
Thank you so much Becky! I think most of what you can find in the charity shops today can be worn or remade successfully, with a bit of styling. I often prefer going for the most ugly or most neglected garments so the transformation is more dramatic :-) Thanks for reading!
Stunning. I can’t believe it’s EXACTLY the same!!
It suits you so much more as well!
Sam
Thanks for the kind comment, really happy you like the dress. It’s not quite EXACTLY the same – especially close up – but considering the materials used I think it’s a pretty decent tribute :-)
Girl, you are rockin’ that dress. Love the “green” factor. Green is the new “X” you know. Fabulous job.
Thanks so much for stopping by, Denise! :)
Great job!
Thank you!
I’m so impressed and inspired!
Will you make one of these yourself?
I would love to but I need to learn to sew first :) This really makes me want to learn properly though and it’s something I’ve been meaning to do for ages now so I love seeing how you’ve made something so fabulous from next to nothing because that’s just the kind of motivation I need. I’ll probably start with some small projects and then one day I can work up to a dress! And I find your instructions on how to make the patterns from an existing dress really helpful because that would be one of my main goals – to make dresses in different fabrics and with some variations based on ones I already own and know suit me well.
Yep, start with something basic and work your way up. Perhaps just a simple dress or top made from a square of material (like my “Eastern Influence” dress) and you can go from there! Good luck!
Incredible! No words for what you did here!
Thank you :) Your kind comments mean a lot.
Amazing. New follower right here. :)
Glad you liked it, and yes, stay tuned for more designer copycats :)
Great job!! I can’t believe your copy cat design looks just like the real thing- you are so clever!
Thanks – I am really pleased you think it looks like the real thing :)
You put a lot of hard work into this dress, and it looks fabulous!!! No different then the designer original. Awesome!!!
Thank you Missy, I appreciate the comment.
Holy Shit!!! This looks AMAZING! And SOOO like the original! I think I will totally copy you!
Awesome! I would love to see your version of this!
win! so much win in this post!
Thanks Chelsea… your comment is a WIN for me :)
you are genius! so much fun.
Thanks! But I think Stella McCartney is the real genius :)
Absolutely epic! Wish I had the figure to sport this dress or I would make one. Your instructions are awesome, too. I was having trouble visualizing the shape of the side panels. Too bad I do not have a daughter – if I did she would be about the right age and this dress really makes a statement. I sew a lot of cosplay for my son and I can really see this being worked up into a cosplay dress too. To me it has a very Japanese influenced feel too it.
Thanks so much for your kind comments, Rosa. You’re right, the simple lines do have a slight manga vibe! Glad you found the tutorial useful too.
im kind of a beginner but i think i could pull this off with your instructions. it looks great and i would love to make my own dress for my 21st bday… but could you explain the tricky part about removing the 2 cm from the beige part… the picture really didnt help me get a picture for what you did. ohh and do you have any fabric suggestions besides the cotton shirt?
ps you look amaze balls in it!!!
Hi Jordan, slash and spread is a method used in pattern making to add or remove fullness. Cut the pattern along the blue lines in the third-last diagram. Pivoting along the outer corners of each piece, rotate the pieces so they overlap by a total of 2cm (for all the pieces total. I had 3 pieces so I overlapped each by about 0.66cm. The individual pieces are marked in red, green and blue on the second last diagram). Then draw a new curve that roughly matches the new position of the pieces. Essentially you want to make the top curve (underbust) shorter by 2cm, while keeping the outside (side seam) curve the same length. Don’t worry too much; the material is stretchy and you should be able to play with stretching it a bit to make things work. Sorry it’s not terribly easy to explain in words.
If you are making this from non-recycled materials, ask for knit materials like jersey or doubleknit, or anything stretchy. It has to be stretchy. Don’t forget you need to use a stretch stitch or zigzag on your sewing machine if you don’t have an overlocker/serger. Stella McCartney does versions in blue/black and red/black which might look more dressy for your birthday. Have fun!
one more question how long did it take you from start to finsh?
It took a while, but I was figuring out the process and drawing my pattern as I went along. I am sure you can do it quicker based on my description, but it depends on how quick a sewer you are and many other things.
Whoah.
Great job! I am seriously stunned at how well yours matches the original.
Thanks for the kind comment! I am glad you like it.
I love your dress!!! Wow that refashion is truly amazing!
Thanks, glad you like it!
You are so very talented—I can sew but only looking at a pattern–God has given you a great gift with all kinds of possibilities …….
Thank you Teresa, you should give pattern making a try! It’s so much more creative, and so much fun.
This is fantastic!!! A must-try project! Now to find a dress to copy! Thanks!
Do try it! Stella’s bold simple shapes were easy to copy in jersey, but I can think of many more dresses that could be copied this way.
Wow !! I really envy your tallent lady!
Very beautiful dress on a very beautiful lady :) I think its even better looking on you!
Love this tutorial very clear and easy to understand .I wish I’d get the hang of pattern making I think it makes sewing easy .
I’m new to sewing, made some things not advanced though, still can’t do perfect sleaves or darts they come uneven and slobbery this always puts me down, can you explain how they are done? haven’t much luck on those topics on the enternet they’er either complecated or hard to follow, your steps were the most clear and understandable although I’m not english.
Thanks for your kindness and generousity to shair your skill and knowledge.
Thank you Shatha! If you’re new to sewing I think this pattern may be a little bit challenging… I would recommend starting with something easier, a skirt perhaps. Sleeves and zips still get the better of me to this day, so don’t feel bad, it’s a constant learning process.
Make sure you are working with simple patterns to start with, and choose easy fabrics to work with (start with 100% cotton), it will make a lot of difference. Also don’t forget you must press everything after every step – the iron really helps it look less ‘slobbery’ and that could be all you’re missing.
Good luck!
csodálatos vonalvezetés,nagyon lenyűgözött
Wonderful lines, very impressed
Thank you! :)
köszönöm!
I came by your post through Pinterest and I must say, you are brilliant! A girl after my own heart, I love thrifting and recreating clothes from charity shops. Thank you for the in depth tutorial, I am very much a beginner and will have to go through your instructions very thoroughly. I am now a follower of your blog! :)
Thank you so much Grace, do have a go at this, I am keen to see how you get on, too!
you look stunning !!! I am a novice at sewing (only started last summer), but am mad about it … just bought loads of material … ideas are racing through my mind … this is going to be my next project …
Great stuff Erica, good luck with your project! (remember to use stretchy material to get a good result for this one)
You make everything look so easy! I would give it a try, but I don’t have your figure…maybe another time! Great work!
Haha thanks! Actually, this was pretty easy… Thanks for commenting.
Love the dress as much as the cover! you are a very talented young lady! I will be back!
Thanks Christy, if you liked this one there are plenty more designer copycats on the site.
WOW!! Aaaah-mazing!! I am now a fan!! It looks perfect. Don’t know if I will have the courage 2 try it but if ever I do I feel very confident from your tutorial. Thank you very much for that!
You are welcome Renee, glad you found it inspiring. This dress has been a big hit! :)
I’ve just started reading your blog, and you are a genius with pattern making – the steps you use to go from your ‘block’ to this seem so simple but they would be beyond me.
I do have one question though, the original dress is quite long, and seeing as you had to piece the skirt to get it long enough why not just make it slightly shorter? You could still do a piecing and turn the pieced seam into a faux hem line or something if that was getting a bit skanty for your taste. I dunno, personally it would annoy me having a seam like that right on the front of the skirt.
Still – it’s brilliantly made, I look forward to seeing what else you’ve got on here. :)
Hi Tanya, thanks for commenting. The piecing at the front isn’t terribly noticeable but I do think the dress needs the length in order to retain the style of the original. Personally I hardly ever wear skirts much above the knee – and without that piece it would have made the vibe of the whole thing different. I’m quite happy with it anyways!
It was really easy to follow and you explained very clearly. God bless you.
Thanks for reading, Tinuade!