
The Refashioners!
This post appeared first on Miss P, as part of Portia’s series, ‘The Refashioners’, in which she challenges participants to remake a garment she selects for us. Why not head over and check out what the other ladies made, here?
It’s amazing what you can get in a charity shop for £1.


This enormous trench coat had potential, but had clearly seen better days. The size, obviously, was completely wrong for me and made me look like a spy from the 1980s and/or Inspector Gadget.

There was a white paint stain on the back, as though the previous owner had leant on a newly-painted railing. Probably the biggest problem though, was that the belt was missing. A trench coat without a belt? Now that really is a challenge. Although the belt was missing, it came complete with the spare buttons.

My initial thoughts were to make this into something totally different – I was going to go for a halter-neck dress. On mulling it over though, on what possible occasion would one wear a sleeveless halter-neck dress made from really thick waterproof fabric? Final decision was that it would have to stay as a coat, but I wanted to make it look as different as possible from the original, with as many feminine features as possible.
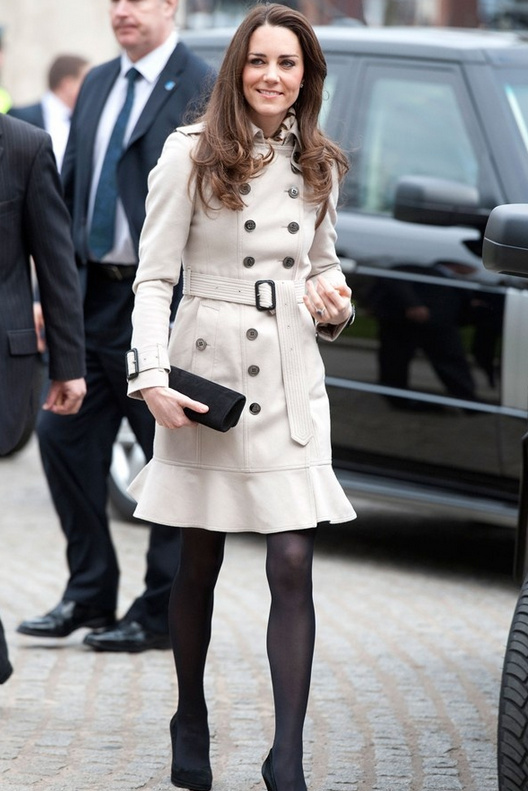
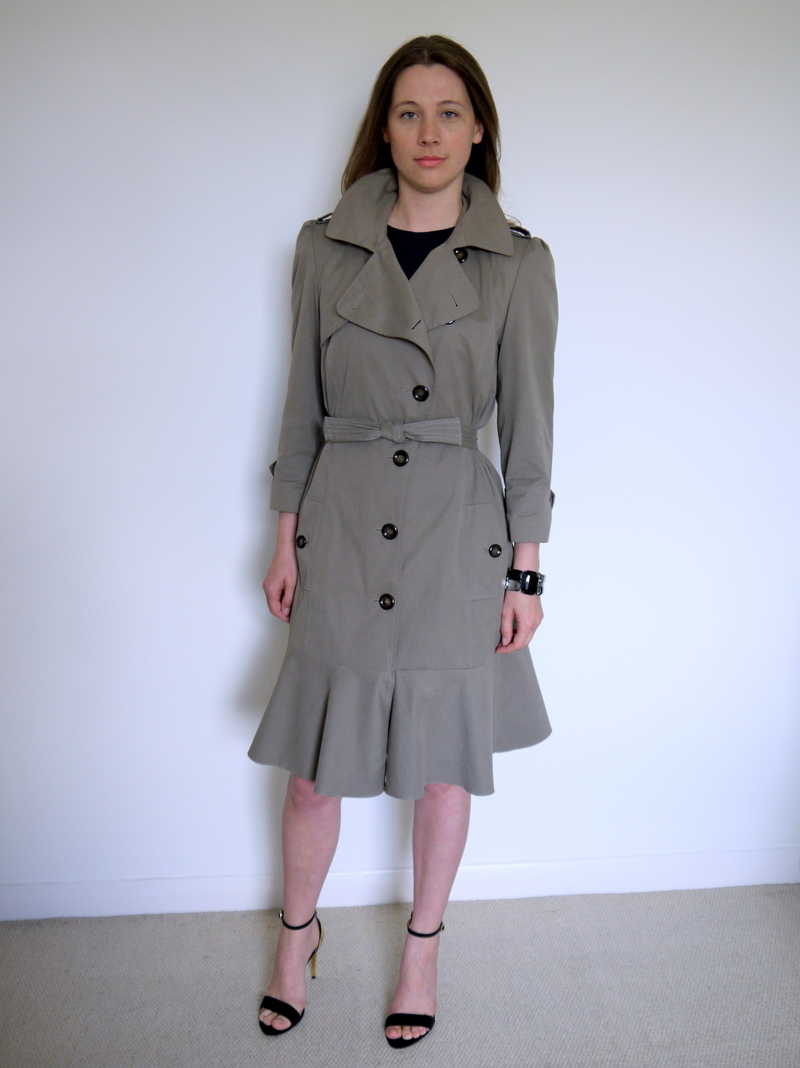
As my inspiration I’m looking at this Burberry trench coat worn by pre-pregnancy Kate Middleton – not my usual fashion icon but I love this coat! The flounce at the bottom really makes it.
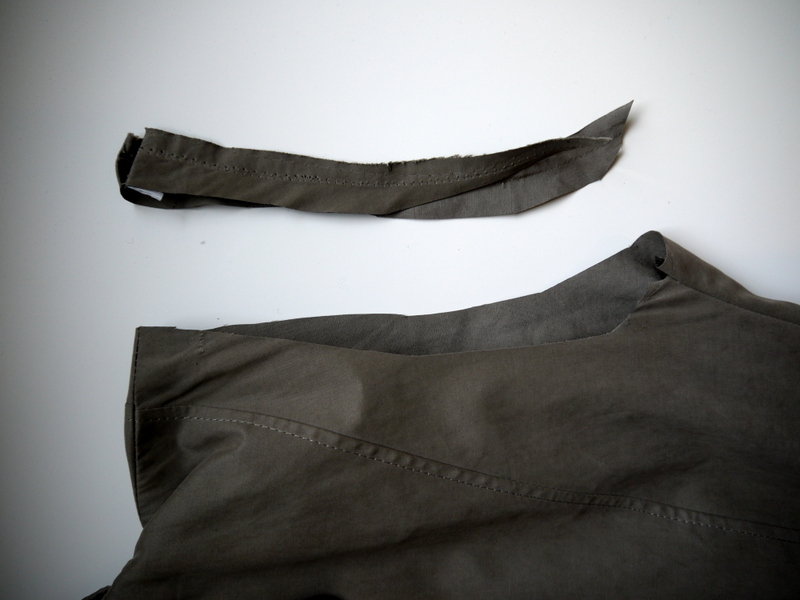
I started by cutting off rather a lot at the hem, 40.5cm less seam allowance, just below the bottom button. I cut through the coat and the lining in one go.
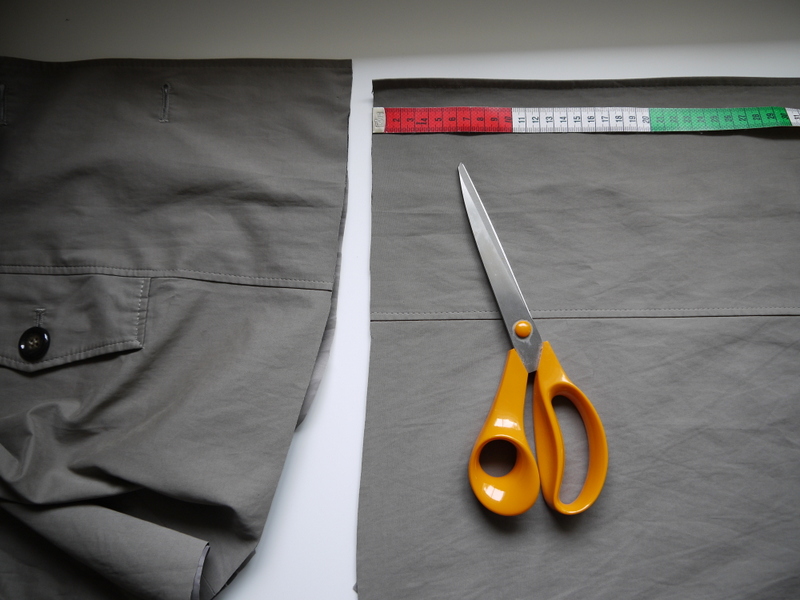
I then cut off the sleeves quickly, as close to the seams as possible.

I also trimmed a reasonable amount from the sides, about 6cm less seam allowance, cutting through all the layers. I pinned to check the fit before restitching the side seams in their new location. I followed the rough shape of the old coat for my new side seams, that is, ever so slightly flared out at the hips. I also sewed the new side seams for the lining.

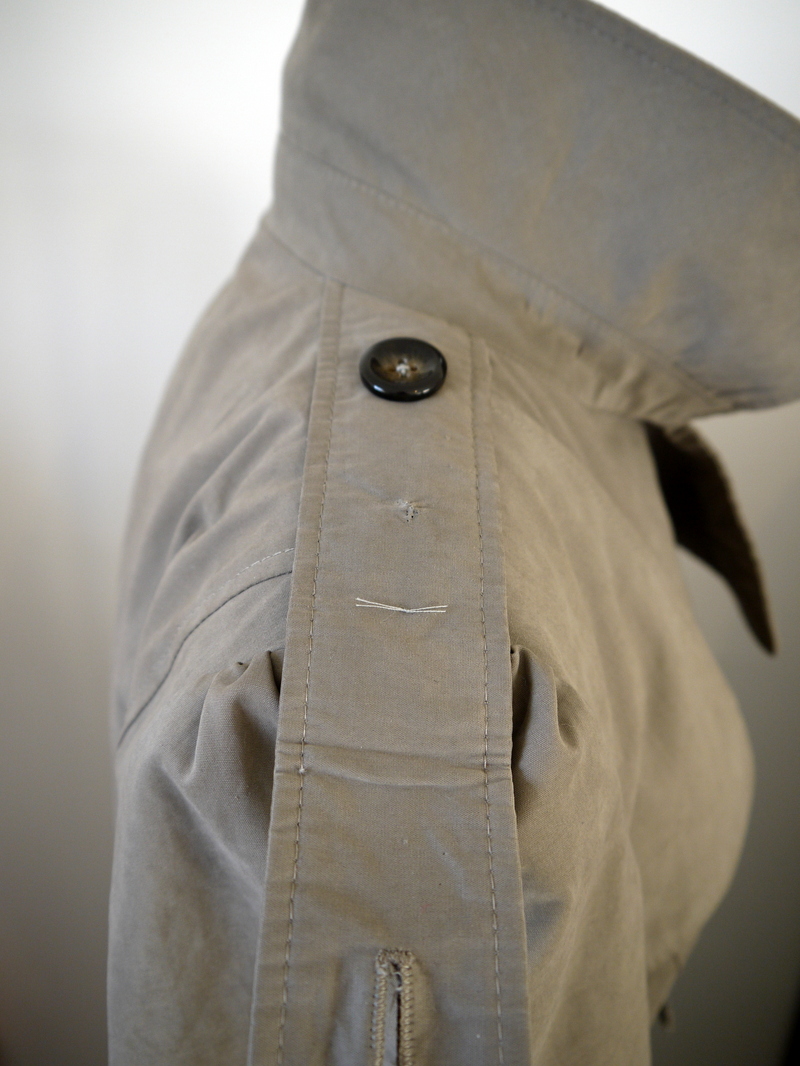
At this stage, I fixed two of the buttons at the front that were hanging off.
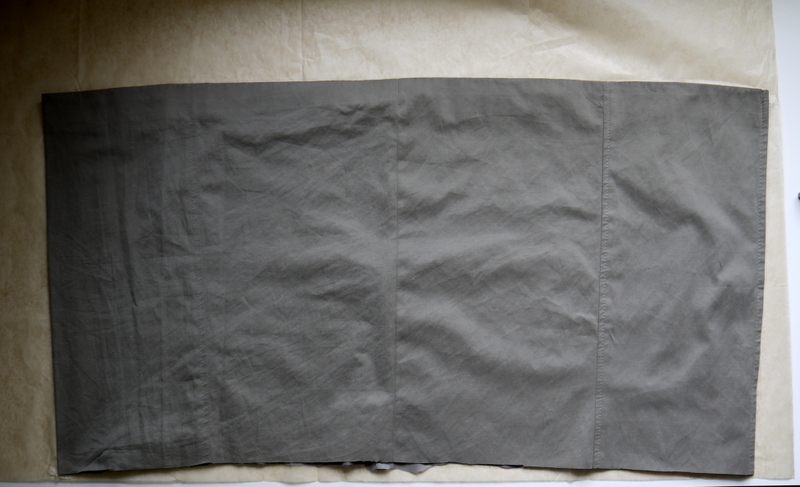
Here’s what I was left with; a good solid base for putting the whole lot back together.

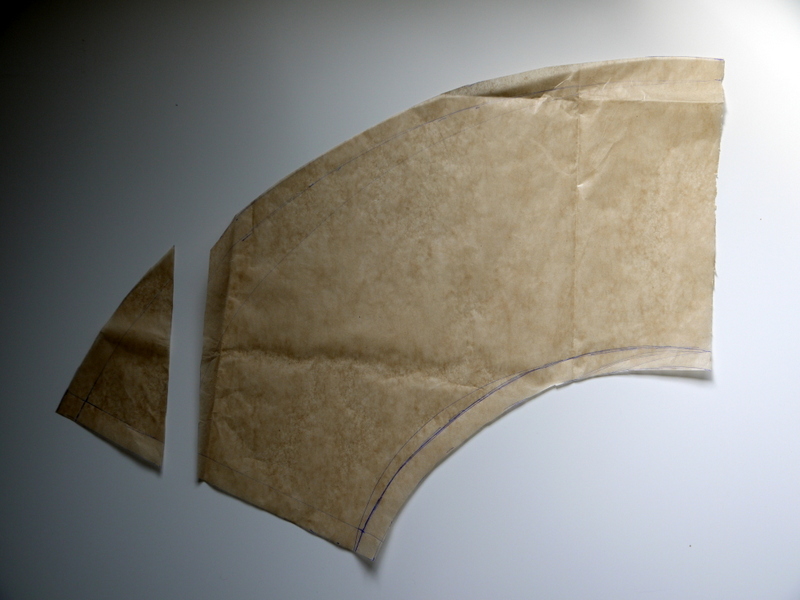
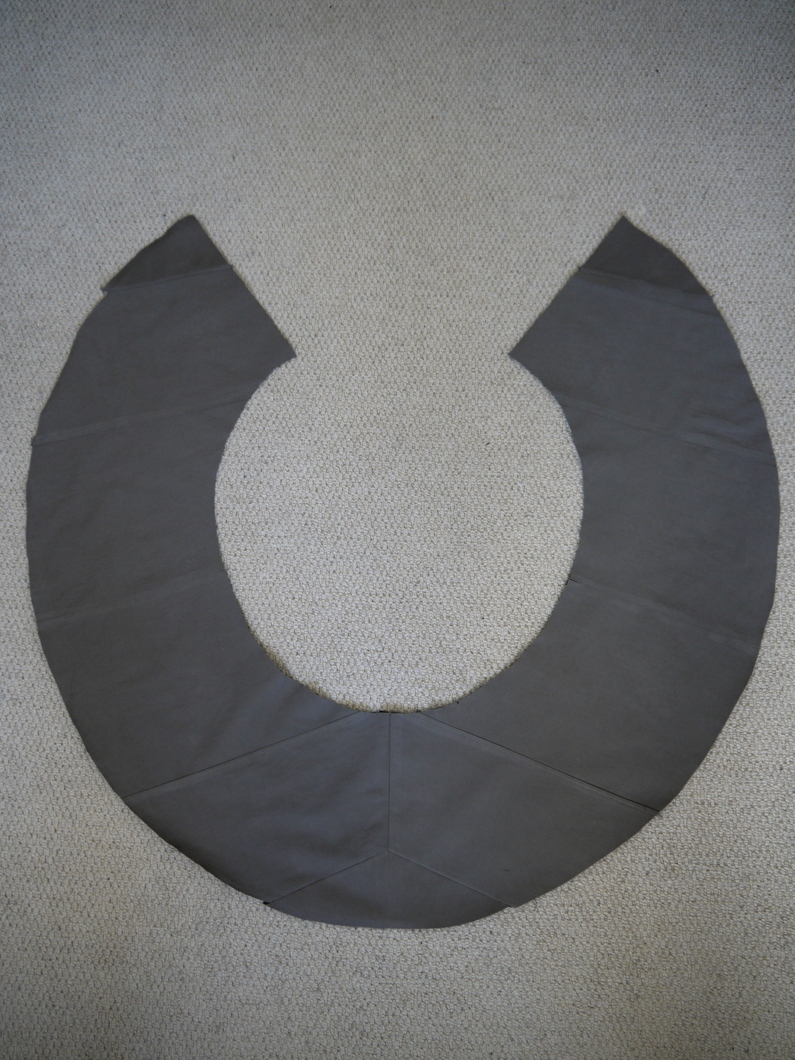
First, the most exciting part – the flounce! In order to draw my pattern, I needed to know how much material I had to play with. I folded the offcuts from the bottom of the coat in half, and drew around it on tissue paper. I then folded it in half again, so I’m working with a quarter of the finished flounce.
Then, working within the lines, I drew a rough circular arc. It was looking too tight, so I redrew it going slightly outside the lines on one side and was much happier. I made my flounce about 20cm deep, and it ended up having a corner pieced together.
Because the rest of the flounce has seams through it from the original coat, the pieced-on part looks perfectly fine.

Here’s the shape of the whole thing.
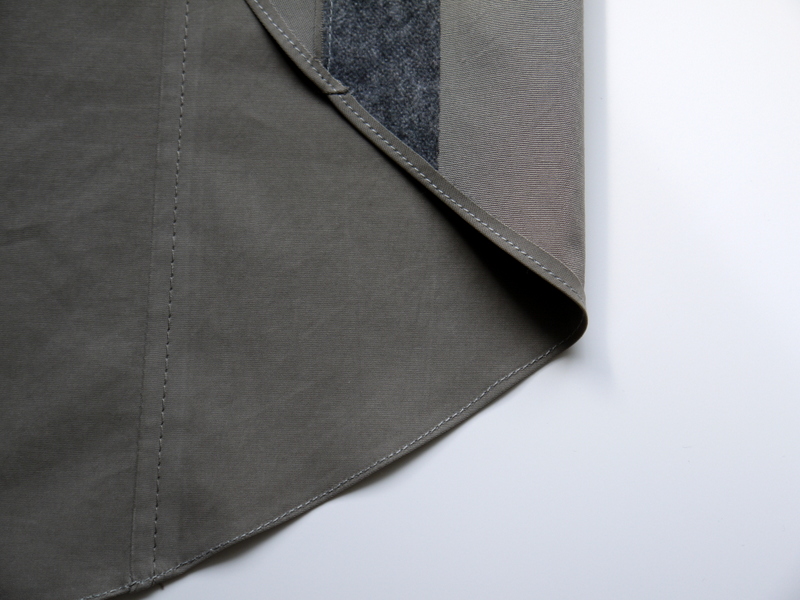
I did a very tiny hem at the bottom. I was going to do a rolled hem, but turning under once seemed to be enough so I left it like that.
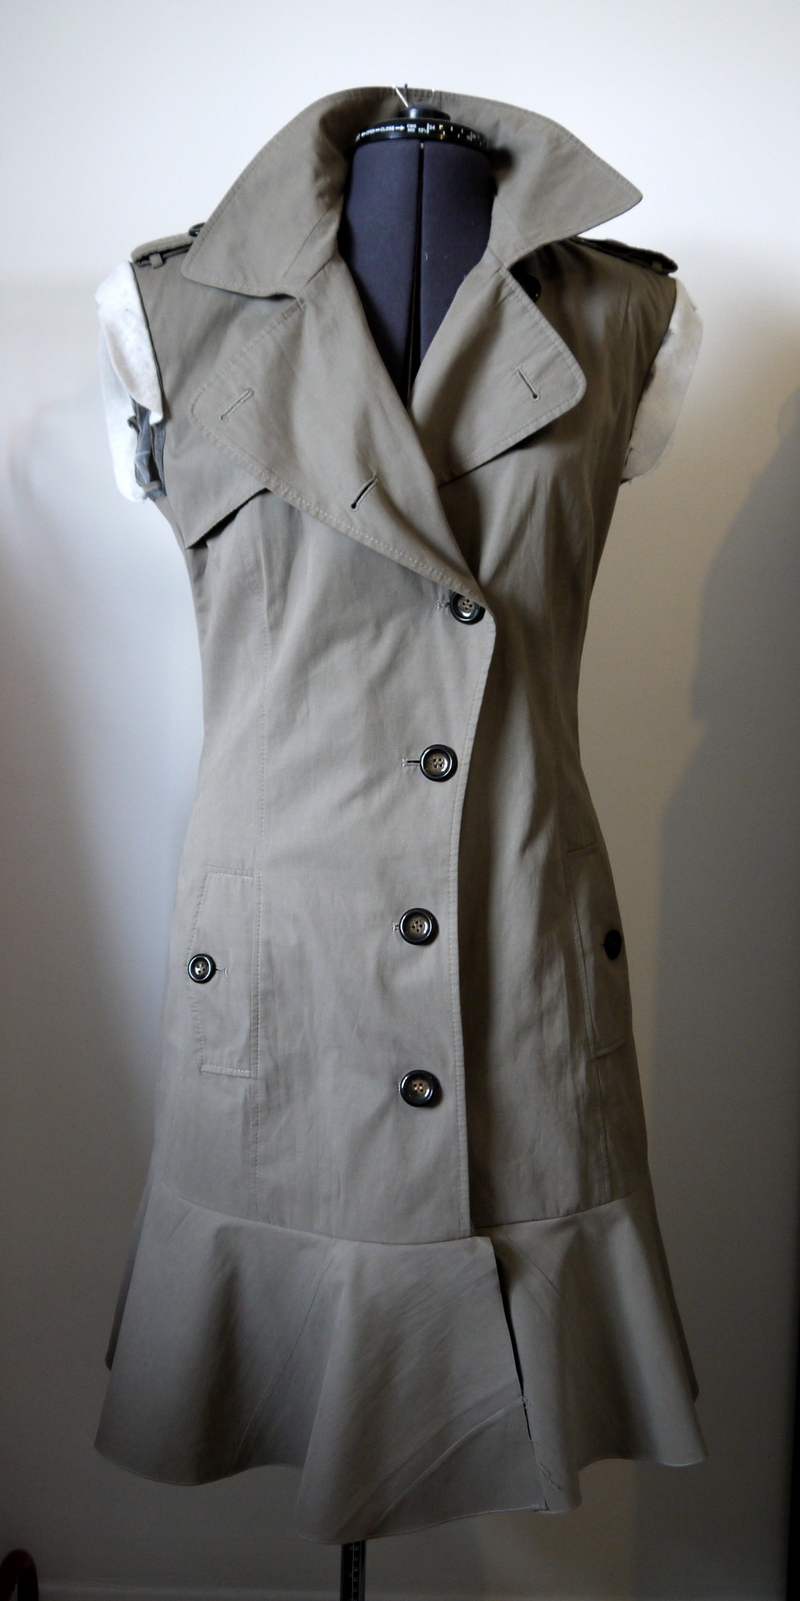
After attaching the flounce, the coat was starting to take shape:
Here’s a close up, taken before I finished the straight edges of the flounce.

Now, to tackle the belt. I used the slightly curved sections I cut off the sides – I basically added some interfacing, sewed them together, turned the loop and added some rows of topstitching.
The resulting belt is so short!

It just about fits around my waist. Obviously I haven’t got a belt buckle, but I worked out that if I tie it twice it takes on a bow shape, rather unexpectedly adding another feminine feature. I rather like it!

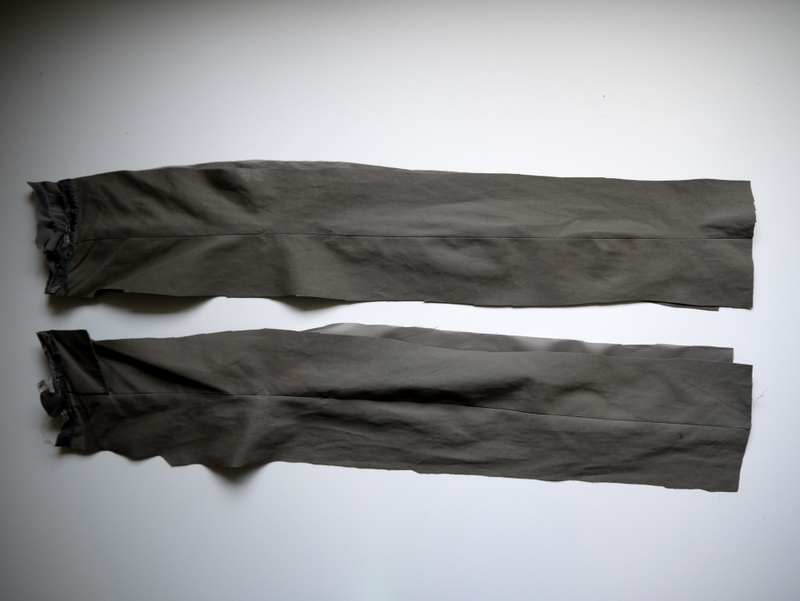
Final task was to tackle the sleeves. This was a big job. I had to psyche myself up with a cup of tea.
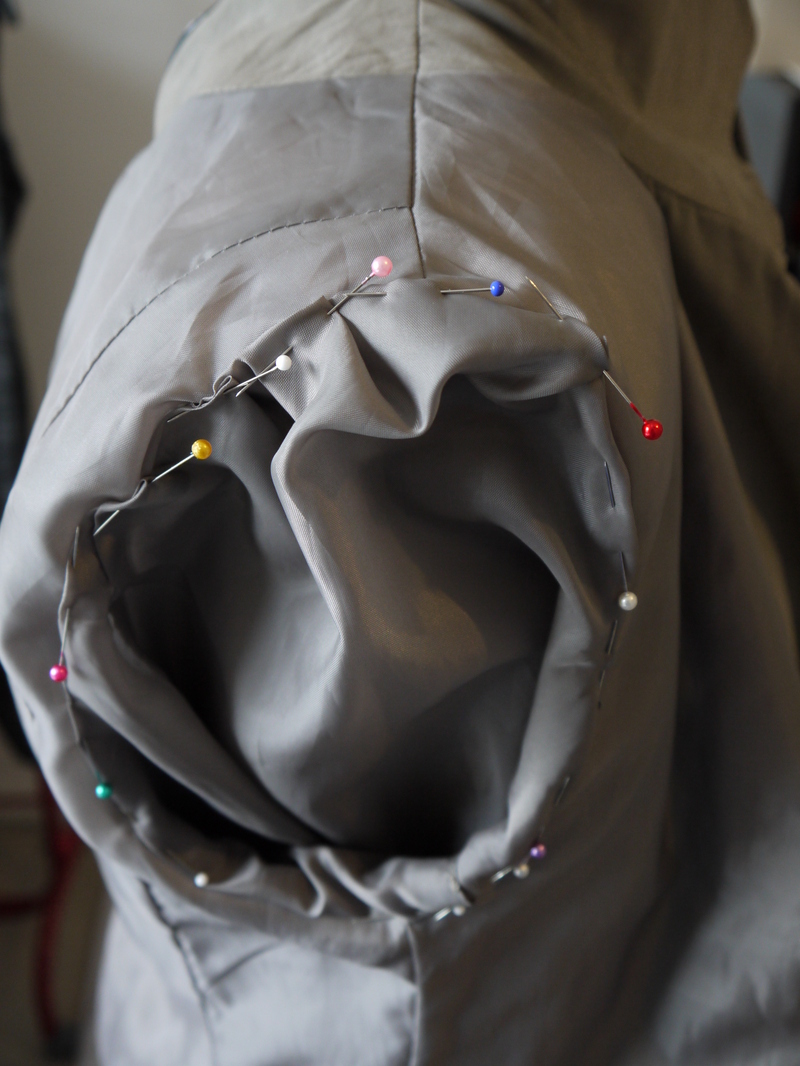
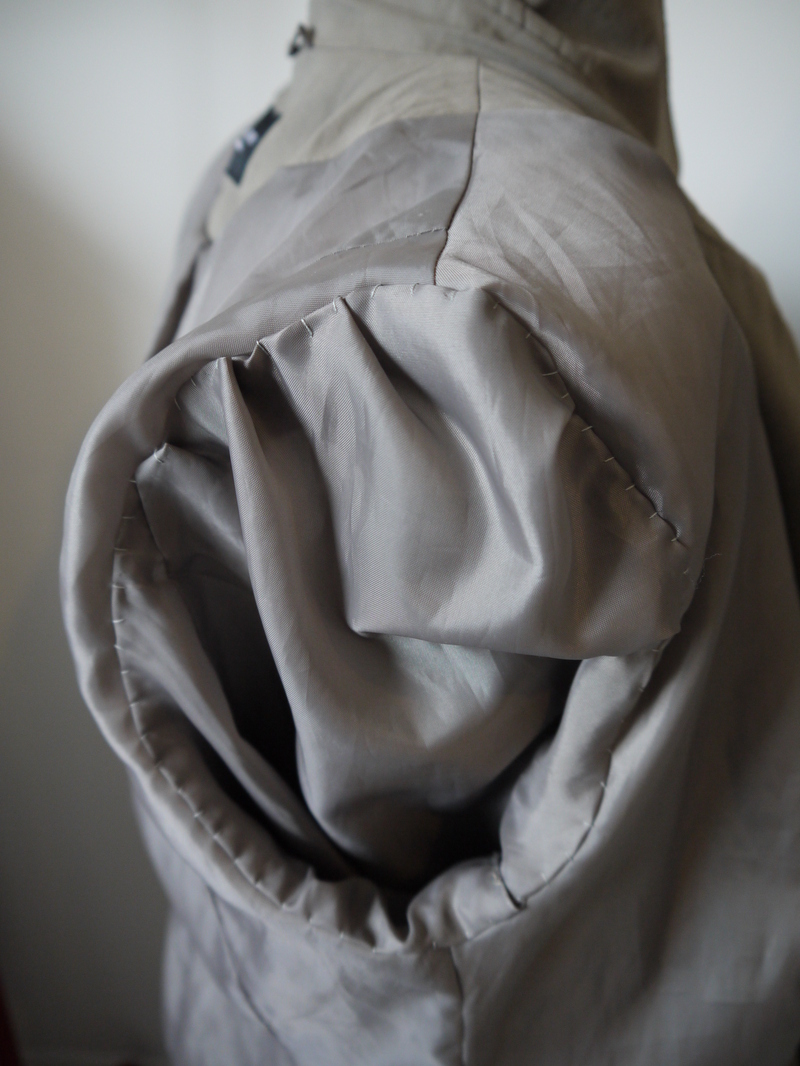
First, I removed the sleeve seams and all the seams holding the sleeve head. Here’s what the deconstructed sleeve head contained – a shoulder pad, some sewn-in interfacing and some stabilisation (the white fleecy strip).

The shoulders were much too wide for me, so I had to trim a good bit off the armscyes. This meant losing the belt loops from the epaulettes.
My new sleeves were going to be bracelet length – another new feminine feature. I wanted to keep the cuffs with the button detail on, so that meant cutting some off the top. I marked 8cm down from the highest point and the lowest point (less seam allowance) and joined the two points with a curve, following the rough shape of the original curve. I did the same on the back, but separately as the curves are different.

I basted on the reclaimed sewn-in interfacing, trimming it to the new shape where necessary.
I used gathering stitches on about the top third of my sleeves in order to set them in. My new sleeve shape was far too big for the armscye curves, so the gathered section forms a nice little puff sleeve effect – yes, another feminine detail.
I added the stabiliser and the shoulder pad afterwards.

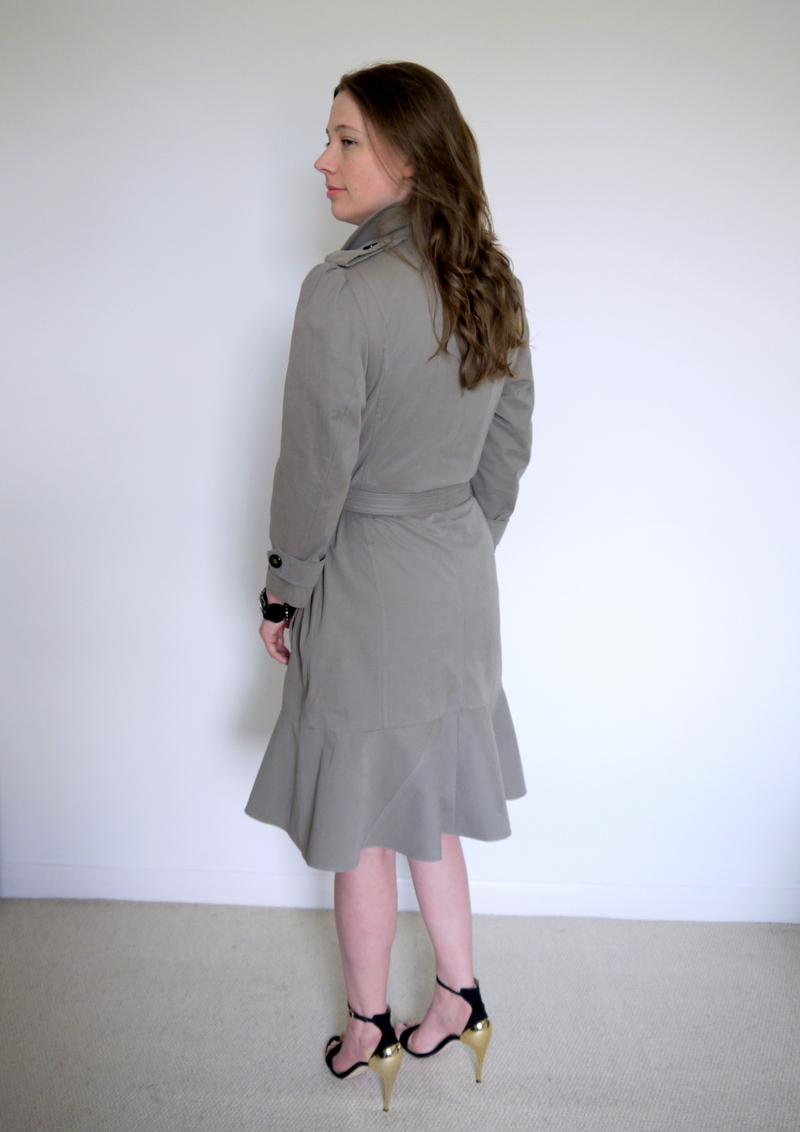
The epaulettes were now too long, as the shoulder had come in about an inch. I moved the button in by a suitable amount then refolded the strips. I added a stitch at the new fold point to help keep it in place. I didn’t bother with re-adding the old belt loops as it was rather fiddly.
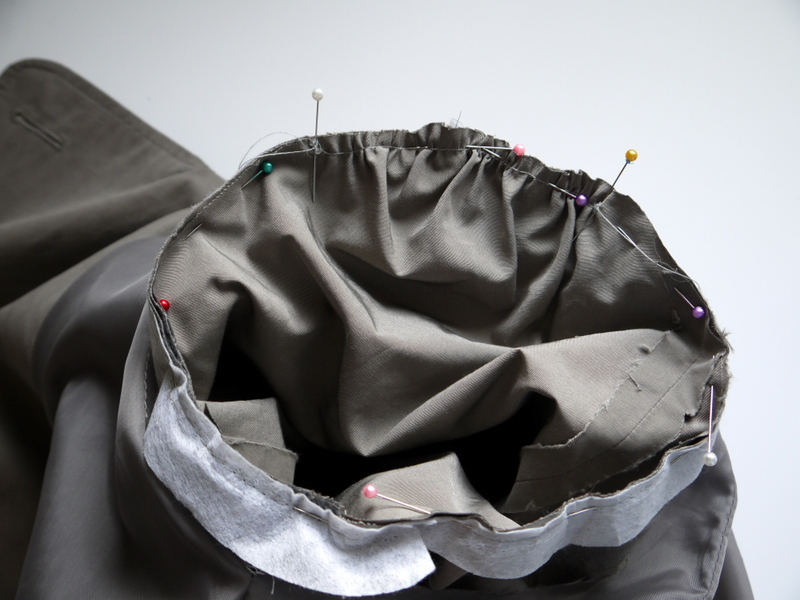
Last thing to do was to make the lining match up. I pinned the sleeve lining to the body lining, incorporating small pleats around the sleeve head to take up the excess fabric.
Then I patiently hand-stitched it together.
Here’s the final coat, which I am rather happy with! As a result of taking it in at the sides, the white paint stain has been vastly reduced but is still visible; I don’t think it’s all that noticeable though. My flounce is a bit bigger than the inspiration picture but I like it!
Overall, I really enjoyed this challenge! I was very excited to see what Portia had sent me and delighted when it arrived. It was great to be pushed out of my comfort zone a little by not having full control over the original garment. To be honest, I don’t think I would have chosen this coat if I found it myself – the paint stain and the lack of belt would probably have been deal-breakers – but that said, I am really pleased with how it turned out. Trench coats, after all, never go out of style.
Thanks for organising, Portia!

Love this! The coat turned out amazingly well. Well done!
Thanks Bec, much appreciated.
This turned out great! I actually like it better than the inspiration coat!!
Thank you so much Coby, just found out that the original coat retails at £983 so I guess I saved £982 ;-)
http://www.polyvore.com/burberry_brit_frill_hem_trench/thing?id=81330435
Love it! So much nicer than the original inspiration!
Thank you very much Melissa, and thanks for reading!
You have done a wonderful job and the coat looks amazing. It definitely looks better than the original!
Thank you so much for commenting! Glad you liked it.
Brilliant as usual!
Thanks Nicole! x
Incredible!
Thank you :)
Hey,
great pictures and a beautiful DIY! Love it.
Kisses
Tabea
http://wolkedrei.blogspot.de/
Danke! :)
OMG, your work just keeps going from strength to strength. Absolutely mind blowing outcome. Congratulations.
Kim
Thanks so much Kim, I really enjoyed getting my teeth into this project!
Amazing! A gorgeous trench coat for a pound. You make it look so easy!
Hi Lindsay, this is actually quite a complex project because of the sleeves! Thanks for reading. It wasn’t even my pound (it was Portia’s)
Wow, you did an amazing job! I especially love the wide flounce at the bottom.
Thanks Dee, I’m in love with K-Middy’s huge flounce as well, I think it adds a great feminine detail to an otherwise masculine coat.
Wow Wow Wow. Your ability to re-engineer something is just astounding. I am just picking my jaw off the floor while I read this. Congratulations, it’s beautiful and brilliant.
Thanks Lizzy, you’re a doll! I think you should give refashioning a try – a skilled sewist like yourself wouldn’t have any problems with something like this, and it’s a much more freeform way to create. Try it!
It’s very very tempting!!
…do it!!!
I feel like I always leave the same comment about how amazing and fabulous you are all the time…I hope you never get tired of hearing it because you just rocked that refashion like crazy!!!
Hi… I don’t think anyone would ever get tired of such high praise. Thanks for the thoughtful comment.
Amazing as usual. You inspire me to try some refashioning myself.
Great stuff, Kelley! Have fun refashioning!
That’s amazing! You’re so clever.
Thank you so much for the encouraging words :)
W.O.W. That is amazing!
Thank you so much :)
Amazing! You are a magician! Great work.
Abracadabra! Thanks for the comment.
great job! Love the new look of that coat!!
Thanks for reading, Cathy!
Impressive! This is my favorite challenge so far.
Thanks Lynda :)
Awesome. I really like what you did with it. I have never been a fan of trench coats, but this I love!
Hi Juli, are you sure we can’t change your mind? Trench coats are a classic! Thanks for reading.
I’ve been following you for a little bit now, always love what you do, but never posted a comment. BUT this is FANTASTIC! Love it!! Great job lady!
Hi Stephanie, thanks for reading and taking the time to comment, I appreciate your support.
Do you have any advice on how to sew that lining material? For general sewing purposes and for hole fixing… Thanks!
Not really sure what you are asking here Meagan… I hand sewed my lining together where required. For hole fixing, you could sew a patch over?
I guess I’m always a little scared of attempting to sew that type of material for fear that it may just fray to pieces. Perhaps I should just get over my fear and go for it. :-)
Don’t worry, Meagan! I know that finishing edges that won’t be seen is a pain, but you could try pinking them for the quickest anti-fray solution? Try to handle your pieces as little as possible too. Go for it! Hope that helps.
Thanks so much! I love your blog – you make refashioning look so easy. :-)
You’re welcome! Happy sewing!
You are a total clever clogs! Love it!
Haha thanks Alli :)
It looks so ladylike now with the flounce and the bow. Once again I marvel at the amount of work you put in.
Thanks so much, the flounce is my favourite feature… the bow is more like a ‘happy accident’.
That is gorgeous! Love it. Quite the dramatic before/after too.
Thanks Katrina! Yep, I cut off a LOT…
so beautiful !
Thank you Liochka :)
Wow! Phenomenal job…so talented!!!
Thank you so much!
Great job! Very well done. I hop you get a lot of pleasure wearing your new coat. I have taken over several of my husband’s old suit jackets. You have given me some ideas on how to tackle them. Thanks
You are very welcome Sue, thanks for reading and good luck with the jackets!
Beautiful job! With those sleeves, a lot of work, but you definitely made it worth your while.. =)
Hi Charity, yes the sleeves were a bit of a headache, but I’m happy with the result.
Another fantastic makeover! I prefer the length of your flounce over the original. Your work is just brilliant.
Thanks so much Andrea, glad you liked the flounce!
Very cool Sally !!! Opens up a whole new realm with ugly and oversized clothes !!!
Thanks, Claudia… the ugliest clothes often turn out to be my favourite projects :)
Nothing wrong with looking like a spy from the 1980s but your refashion is beautiful, and very feminine!
Heh, thanks Joyce :)
You took a bland trench into something so stylish and with a cute twist. Love your refashions, and I never get tired of seeing the amazing transformations you make out of ordinary garments. I could just kick myself for giving away a lovely butter yellow trench coat that was 3 sizes too big. At least I gave it to someone who benefited, and that is far more important. Look forward to your next refashion — you never cease to surprise and impress me with all of your creativity.
Thank you so much for the comment! That’s a shame about the trench, but sounds like it went to a good home. You could always raid the charity shops for another one!
Woot! Nice job!
Thank you :)
Oh My!! What a superfantabulous job you have done! And, looks like so much work, but you pulled it off perfectly!
Thank you so much, yes it was a lot of work, but it was worth it!
I don’t know if you can find this in the UK, but you could order it online. There is a product called Paint Erase. Buy it in the gel format and it will remove the paint from your fabric without damaging it or discoloring it. The coat looks beautiful, so it might be worth the investment.
Here’s a link if you want to buy it online. http://msepusa.com/store/
i always enjoy seeing your projects! Keep up the good work.
Thanks for the tip, Beth! I’ll check it out! :)
Wow! You are incredibly talented! I love reading the tutorials for your refashions, because I always learn something new. Where did you learn to be such a skillful sewist? I need to take classes from you! Love the coat too! I like yours much better than the original! :)
~Jen
Thanks so much, Jen! Really glad you liked this coat. If the British ‘summer’ continues like this, it’ll be getting plenty of wear…
I love what you have done here. I just had two similar trench coats placed in a garbage bag to donate to the Good Will. Guess they will be coming out now and into my pile of things to do. Thank you so much for the great pictures and instructions. Such an inspiration.
~Pam
Hi Pam, thanks for reading. Yes, get those old coats out and start cutting! Have fun!
Good lord you’re so much braver than I am. I would never have been so ambitious but this is inspirational. You should be on TV!
Hi Cat, so glad you are enjoying reading. Sadly I’m still waiting for the TV networks to call…
I have been looking at your creations for some time. I am an experienced seamstress. I have a thrifted trench in red. I think I will follow your example.
Great stuff Genny – good luck with the trench project.
Love, love, love this. You have such a great eye for the possibilities of a garment. I always look forward to your posts.
Thank you very much for reading! :)
Amazing…between you and Fashionista I’m going thru my wardrobe and starting to refash items instead of buying new. I did my first last week and only realized after it was finished that I had forgotten to take a before photo. Oh well. Next time for sure.
LOVE LOVE LOVE your stuff.
Hi Sunny, thanks for the comment. That’s great that you’ve started refashioning. Keep it up and have fun!
Absolutely and utterly amazing. I’ve just stumbled across your blog and I will be spending the rest of the day soaking up your ideas. Brilliant!
Hi Rachel, hope you enjoy reading!
You are my favorite refashion blogger! You are so creative AND have technical skill too. WOW! Thanks for sharing with us, and keep up the great work!
Thanks so much for the compliment, MJ. :)
amazeeeeeng….the peplum seems so easy to do, but i blew it twice before, but after seeing this post, I guess I will have to try again, U BIG INSPIRATION!
http://etheea.wordpress.com/
Peplums don’t have to be complicated. Just add a simple ruffle.
That really is brilliant!
Thanks, Jane!
Simply incredible! You look fab! ~M.
http://redesignedbym.wordpress.com/
Thank you! You’re very kind.
Jaw-dropping!! Fabulous job.
Thank you lovely :)
Wow, I’ve never wanted a trench coat before! (even having seen Kate’s one previously). You did an amazing job with this.
Thank you Kathleen! :)
Wow, this is inspirational!!!! I LOVE tackling big projects like this and have not felt an itch in my fingers of this magnitude until reading your post! Ahhhh, I could almost feel the adrenaline rush of messing with the sleeves and finding out that the belt would accidentally create a lovely little bow! What a feat and what a truly beautiful garment as a result! Now if I could only find a second hand shop where I live…. So far I have only seen ONE and that was for baby-stuff…! It would be very difficult to create something for a woman of over 6ft tall from that shop. :D Anyway, keep up the VERY good work and just make me jealous of all the fun projects! The good kind of jealous. :)
Hi Maiken, thanks for the comment. I love big projects too! This one was a lot of work, but figuring out how to overcome all the little challenges was great fun. Hope you find some places to shop so you can get sewing too!
Absolutely love how the finished garment turned out. And I appreciate that you take the time to do your refashions well, instead of just slapping something together.
Hi Natalie, thank you for the compliment! You are too kind! :)
Really beautiful, Sally! I might have to try something similar, maybe with a dress instead of a coat though.
Thank you so much, Beth. I think the flounce would work really well on a dress, provided there is enough material of course!
This is simply brilliant! I love it- very feminine, as you intended, and yet fully functional as a coat. I think I will most definitely be trying this in the future. Thank you for sharing!
Hi Desarae, you should definitely try this! Good luck with it!
Hi, I’ve only recently found my way to this blog. This is one of the best remakes I’ve seen anywhere. So many remakes involve taking the sleeves off and /or shortening the length… yours really took some skills. My congratuations!
Hi Holly, I am glad you found me! Thanks for your kind words about the coat. This one was a lot of work, but it was worth it!
Such a clever young lady it’s good to see someone use the brains and talent so often ignored I’m so impressed good luck with your future endeavours
Thank you, Mandee! I want more people to take up sewing and refashioning so blogging is my way of encouraging that.
Very impressive – you have inspired me to do this to a coat that my Mom had in her ‘belongings’!
That’s great, Juliana! Have fun sewing!
Great refashion project! The result is really incredible!
Thanks, glad you liked it :)
You are amazing! This is a very inspirational refashion and looks incredible on! I hope I can achieve results like this. Look out mens department; here I come!!!
Thanks for posting all of the instructions too!
M
Thanks for commenting Marsha, good luck with your refashions!
Your tutorial of the refashion is spot on. I love the flounce and bracelet length sleeves. I will be looking forward to my next project and since our seasons have turned cooler you have given me new inspirations to work with.
Thanks Debora, this coat was great fun to work on and I hope you enjoy making your own version!
Beautiful work! Have you tried non-acetone nail polish remover on the paint? There should also be some paint remover products at your local paint store for use on fabrics. I’ve used them with great results.
Thank you! I never thought there might be a product specifically for removing paint, I’ll look out for some, thanks for the tip!
This coat looks wonderful you did a great job thank you for sharing
Thanks Delilah, and thanks for reading! :)
This is gorgeous, even better than dutchess kates. I felt her flounce was out of.proportion. yours is perfection. Great job, very inspiring
Thank you Kim, it’s not everyday I get told my outfit is better than Royalty ;-)
Beautiful!! Well done 👍
Thanks, Dusty!
Found you when searching for ‘jacket alterations’.
I’m thinking about downsizing a man’s tweed jacket for myself.
You confirmed how I thought I should do it.just got to pluck up.the courage (and the patience lol!!)
Happy refashioning fellow charity shop lurker!!😉
Hi Diane! Thanks for reading and good luck with your jacket refashion!
Wow! Tailoring on the sleeves turned out great and the flounce is beautiful! It looks classy and sexy! That was a very inspirational project.
Waw il est super beau. Beau travail.
Merci beaucoup!
Brilliant!
Love it! It’s nice to see your talent at work. I love doing this stuff too! You are an inspiration!! (And Kate’s coat too)
I think the result Is so awesome. I do reconstructions, but I could never
Imagine taking on anything like this.
Kudos to you.
Probably one of the best refashions I have seen! Great job! Wish I could sew like you!
WOW…that is some tremendous sewing. What a fantastic job. The outfit is beautiful.
I’ve only just come across your refashion post Sally your patience to detail is a credit to you as
your trench is gorgeous on you, love your write-up detailing your process. You’ll enjoy wearing your new trench. I charity shop & have refashioned a dress, I don’t think I’d take on a project such as you’ve detailed though. Beautifully sewn.
That is an amazing transformation!! Great job! You’re very creative! 😊
Love it! Is fabulous! Congratulations !
I like yours better.
Fantastic!
I love this trench coat! I wish i was a better seamstress. If i was, i would attempt this myself.
That is one amazing transformation!
I love the detailed description and photos of how you did it, especially the flounce, that really sets it off with the bow tie belt.
I love it. You shoulf be really proud of yourself.