
Making Shoes (With Mixed Success)
So… there have been a few people in the world of sewing blogs (notably Carolyn, Sue and Jodie) who have ventured into making their own shoes. It’s kind of a natural progression from making your own clothes, except it isn’t, because you need an entirely different set of materials, tools and skills. Still, inspired by the work of Carolyn, Sue and Jodie, with the appealing idea of having custom made shoes in whatever colour/fabric I choose, I did a little research. There are some resources available online for making shoes – I know Jodie took an online class at Shoemaking Courses Online and rated it highly – but there wasn’t much around for free. And most of the stuff I found on Youtube required a full setup of specific styles and sizes of shoe lasts and specialist hand tools, not to mention materials and hardware that are not available for easy purchase by total amateurs. Rather than do the sensible thing and invest time and money in skills, tools and materials, I continued to research shoe making with the idea of attempting to make a wearable pair of shoes from household objects with only basic tools. (Ambitious? Moi?)
I probably should have started with sewing a rope washing line into a pair of espadrilles or something, but frankly, I have never worn espadrilles… my summer shoes are more the 6″ tottering wedge variety. Still, sandals are simpler because that eliminates the need for toe puffs and heel counters (specially shaped pieces of plastic that help the heel and toe hold their shape), and the lasts are not as critical to the process. Flat sandals would probably have been a good option (I considered both Greek style leather sandals and Pakistani style Khussas – I may yet make both of these) as they don’t need the metal shanks and heel hardware you need for high heel sandals, which are really hard to buy anywhere. Also, considering it from the refashioning/recycling angle, options for refashioned shoe projects are minimal if you’re not keen on wearing pre-loved shoes (it’s so hard to clean them!). One option was to butcher an old pair of shoes for the hardware, but without the lasts to help you put it all back together again, it was going to be tricky. I thought cork wedges would be a good compromise as they don’t need the metal shanks, and cork is easily available. Another idea was clogs or some kind of wooden soled shoes, but that would have required a lot more in the way of carpentry skills.
Of course, I googled “how to make shoes out of cork” and straight away came back to Shoemaking Courses Online, which looks like a super site. They have a whole course on how to make cork wedges, and the course description page has a breakdown of the steps involved along with video stills from the lessons. I should note here that I did not purchase the course, but looking at those few images was enough to make me believe that it could be done with minimal tools, and to give me the basic steps. So what follows is in no way a review and is not a reflection on the quality of the course, just to be clear, though it looks excellent.
I gleaned three key pieces of information from the course page. One, you can build up the 3D shape of the wedge by glueing layers of cork together. This allowed me to use abundant, cheap cork placemats instead of going for more expensive items such as cork yoga blocks. Two, you can shape cork easily by hand using a file. And three, you can use the file to take a fairly simple extrusion of a sole shape into a more complex 3D object that looks like an elegant shoe (I was finding it hard to visualise this initially).
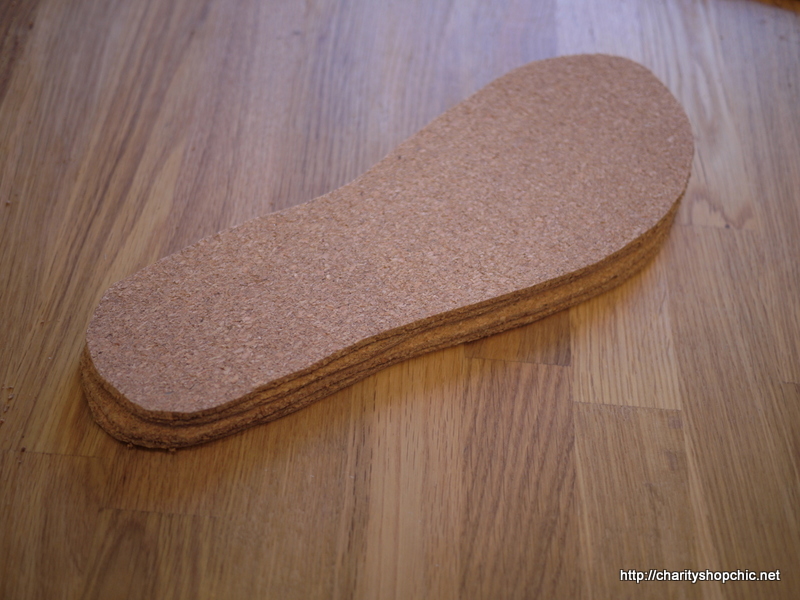
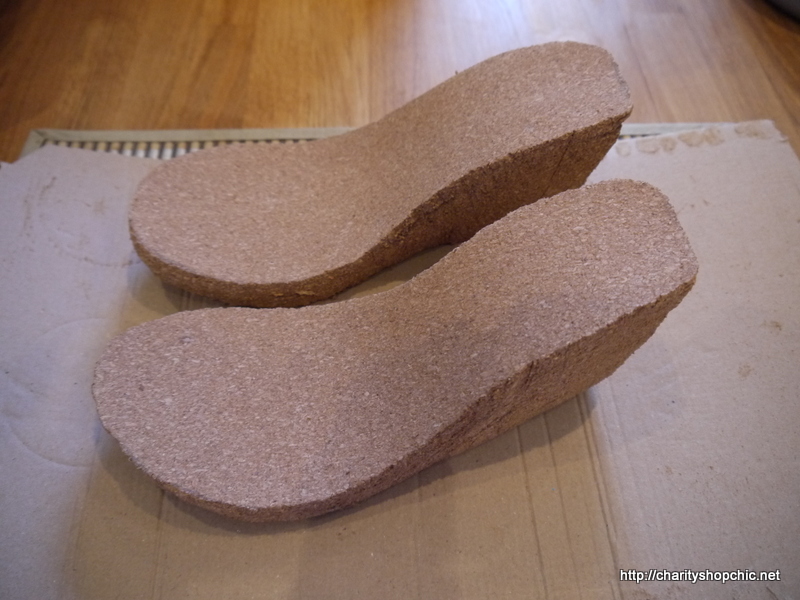
I started by gathering raw materials. First, one packet of IKEA cork placemats. There are four and they are 42 x 32cm and 3.5mm thick. Compare this with the materials in the online course – hers looks to be about 1cm thick which means a lot fewer layers and therefore a lot less work, but this is what I had.

Next, some fun fabric for the uppers. This top I bought several years ago in the Marie Curie shop in Middlesbrough. I recognised the fabric immediately as Minerva used to carry it – Clare made a stunning dress with it at the time.

This was £4.00 and I snapped it up with the intention of wearing it as-is, but it was just a bit too big to be flattering.

Lastly, another type of IKEA placemat which I earmarked for the shoe soles. These turned out to be not terribly suitable, but read on to find out why…

Making a pattern seemed to be a good first step. I drew around my feet and compared the shapes to some of my existing shoes to see how much bigger the soles would need to be.

To my surprise, the soles of most of my shoes were actually smaller than my footprint. So I did my best to emulate the shapes.

I based the shape of the wedges on a comfortable pair of “cork” wedges I already own.

Here’s the shape from the side on. Note the toe section curves up a bit to make it more comfortable to walk.

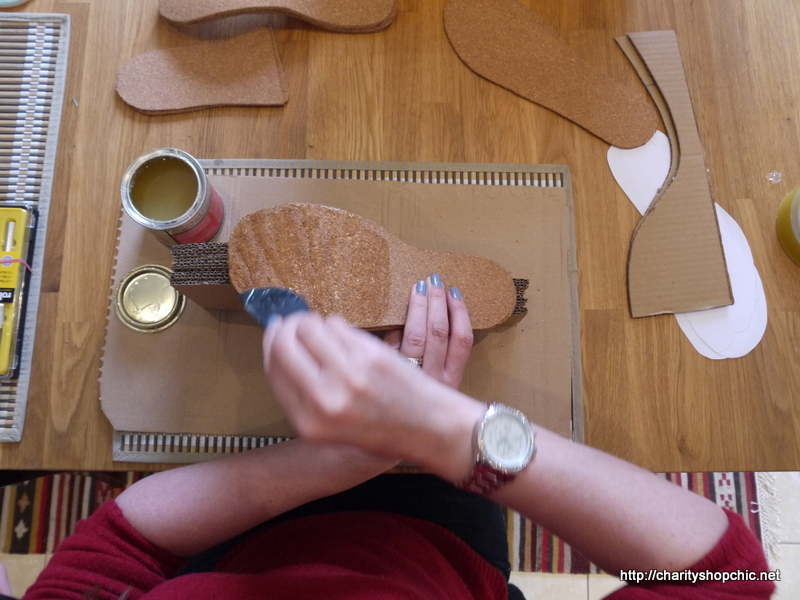
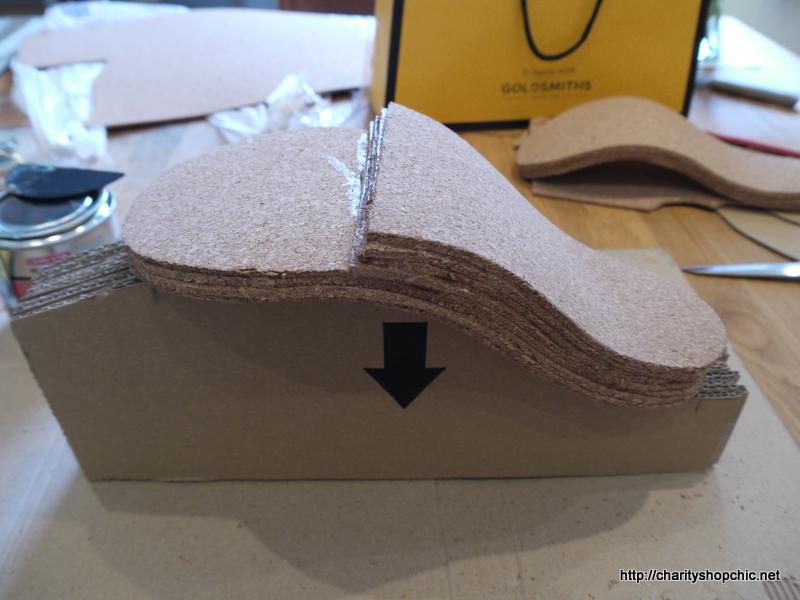
I made a jig out of layers of cardboard glued together, in the place of any kind of shoe lasts. Corrugated card glued together like this is actually really strong in the vertical direction (direction of the arrow below) so it was perfect.


I also copied the shape of the wedges’ soles by drawing around them and adapting the shape to my foot drawings from earlier (with a more rounded toe as a result).

Here’s a comparison between the shape of the foot drawing and the sole – very different!

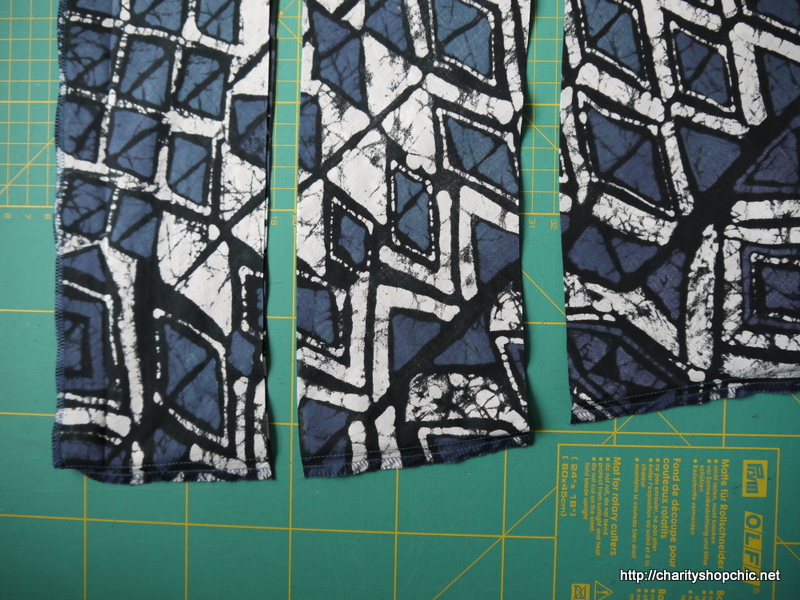
The black placemats looked really cool cut into a sole shape as they had a rough surface and a sort of tread. This black stuff is pretty spongy though – like polystyrene – which should have been a warning bell.

For the first few layers of cork, I just drew around the foot shapes and cut them out with scissors.
I glued them together one by one, pressing down with my hands onto the jig I made to get the right shape. Incidentally, I’m using Evo Stik Impact contact adhesive, which did an excellent job. I just spread it on one surface (as per the instructions for porous materials), placed the surfaces together and pressed down for about 10 seconds, or until it stuck.


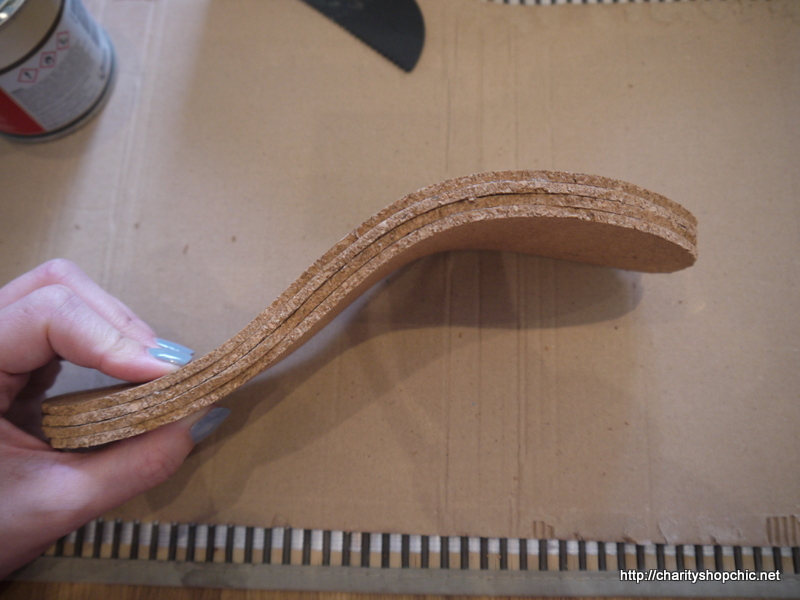
When dry, the cork layers held their shape well.
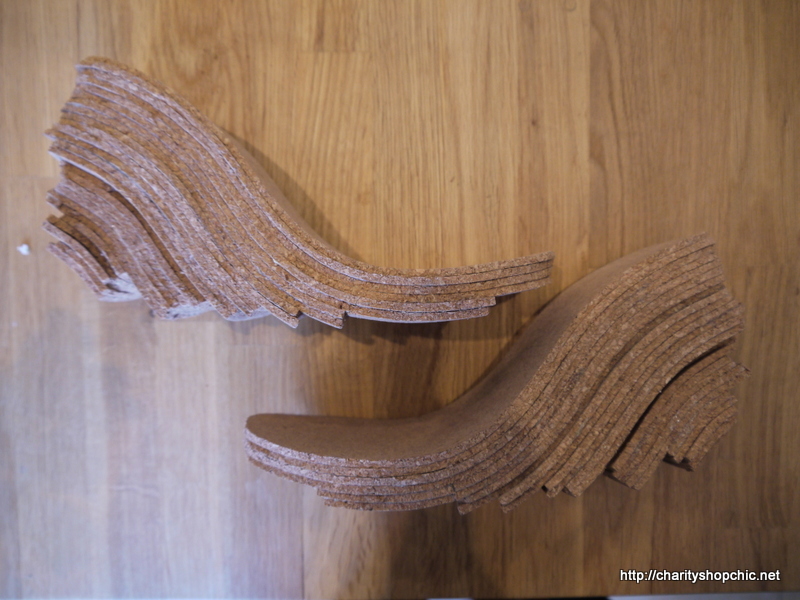
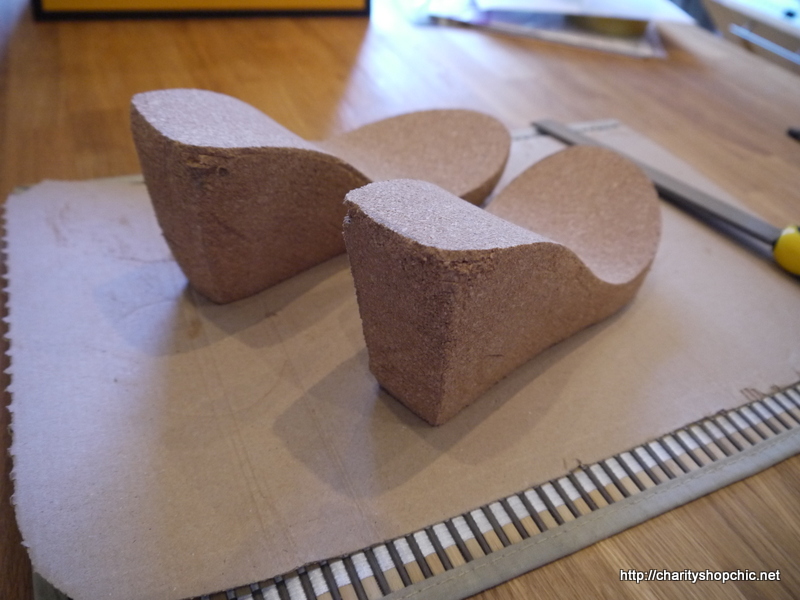
After the first four layers, I took stock of how much cork was left, and cut the following layers up to the ball of the foot only.
Layer by layer, it took shape. Don’t forget I was making two of these (a right and a left shoe).

I kept comparing the shape to the drawing to make sure it was going to plan.

As I got further down the heel, I used smaller pieces of cork to make sure I had enough.

The final pieces were very small.

There are about 20 layers in each shoe and many, many hours of work.
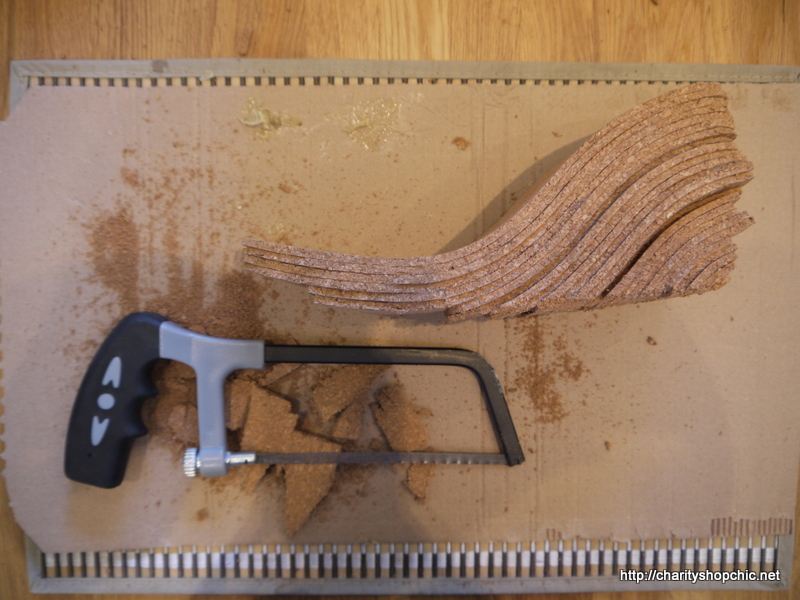
Next, shaping the wedges. I cut the bottoms roughly flat with a small hacksaw.
I must say I was very excited at this point as they were starting to resemble real shoes!

Next came the filing.
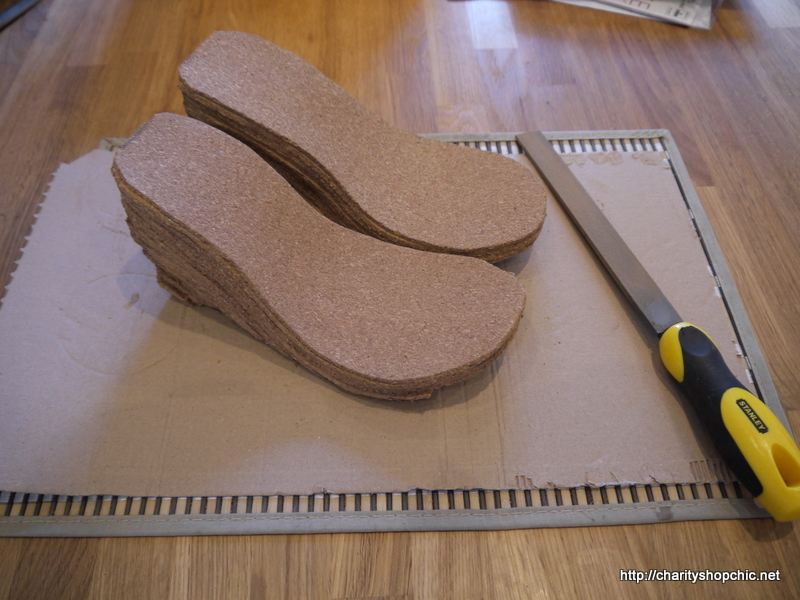

Once I was fairly satisfied with the flat bottoms, I drew around the soles onto them, so they could be shaped. The idea is to angle the sides of the wedge from the outer edge at the top of the shoe, in towards the edge of the sole at the bottom of the shoe.

First I cut off the back at an angle.

Then I drew on the angle for the sides.

It turns out, filing is a lot of work and makes a heck of a lot of dust. So I resorted to taking most of it off with the hacksaw.

And then smoothed the whole thing off with a lot of filing. The cork was easy to file, even over the glue, and the wedges became a lovely smooth shape.


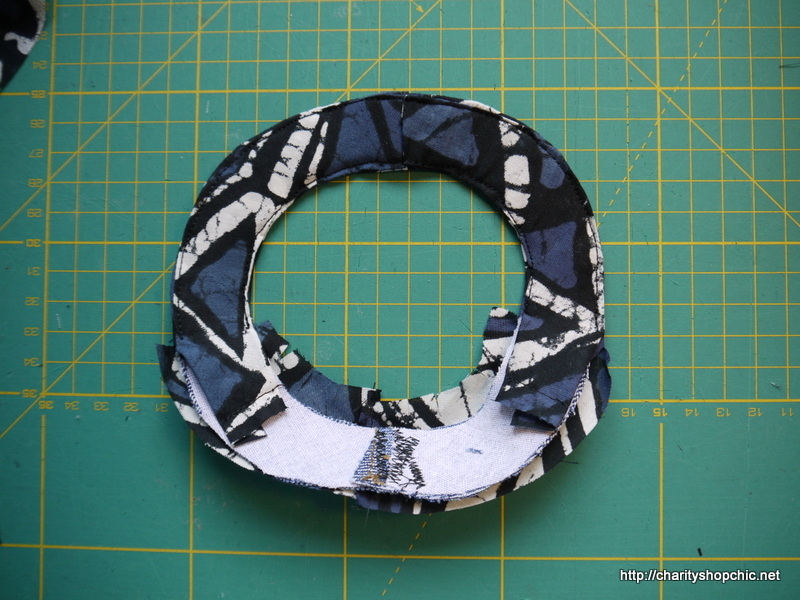
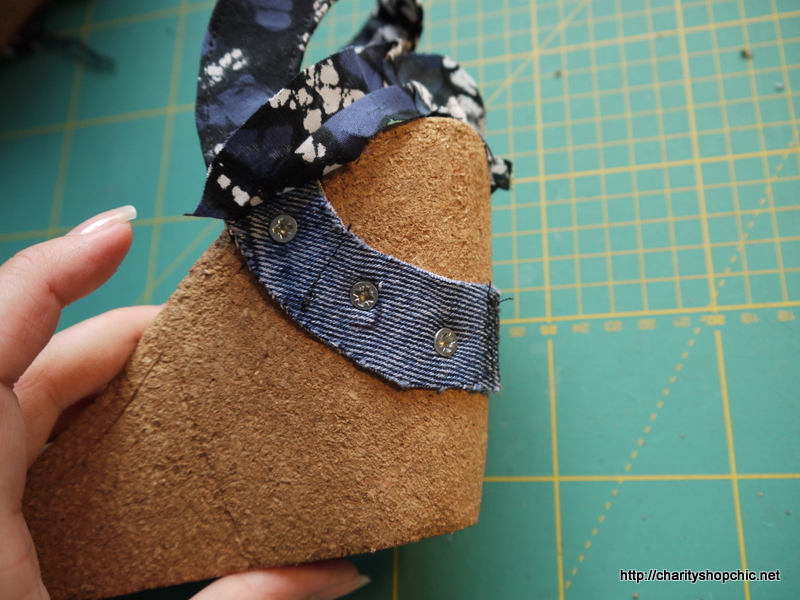
With the cork part complete, I had to think about the uppers. I was concerned about nailing or screwing in some straps vertically as I thought they would easily pull out of the cork when I walked (though I didn’t test this). Instead I decided it was safer to screw them into the sides of the wedge. It does mean screwing the screws into the thinnest part of the wedge (under the ball of the foot), which could possibly weaken it at those points, but this way the ends of the fabric straps can be hidden between the cork and the actual sole, which is glued over the top. For the heel straps though, it took a while to come up with a way to hide the ends that didn’t result in really long straps. I settled on straps with no ends – circular ones.

Making a paper pattern for these was simple trial and error. It was quite fun pinning the paper on to try it on, like a cork notice board.
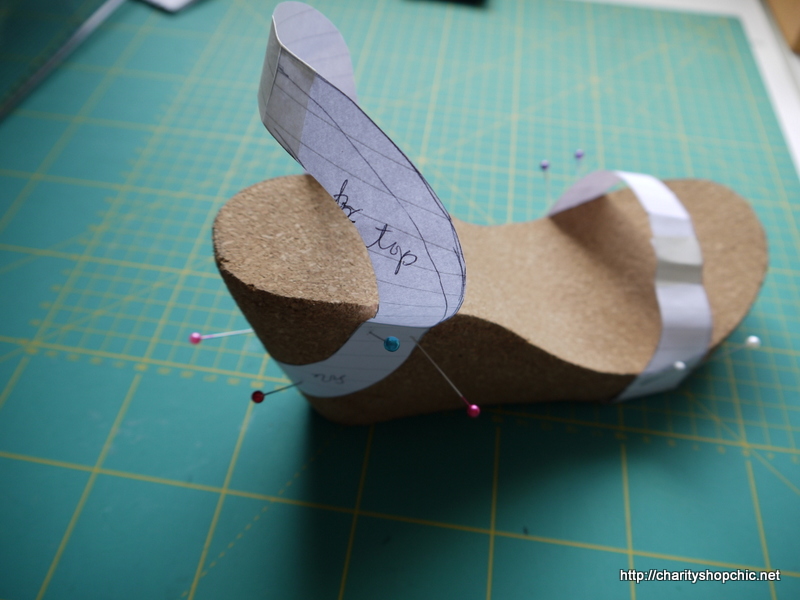
Here are the shapes I ended up with. The circles are tied to the feet with long ‘ribbons’ or ties which are wrapped around the ankle and tied in a bow, but I could have used some small hardware like tiny buckles or something. I just wanted to keep it as simple as possible. The idea at this point was to sew two ties to the circle and tie them together.

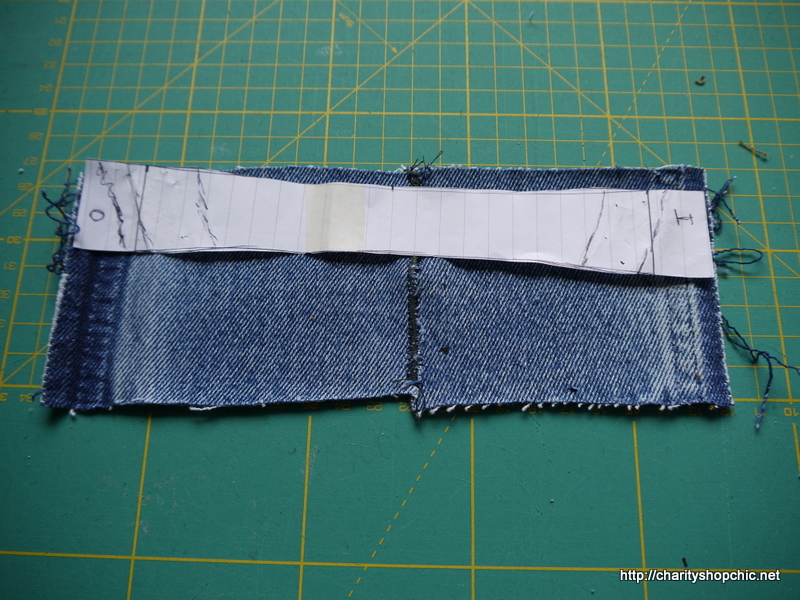
I cut the strap shapes from some leftover thick denim from another project, intending to cover these with fashion fabric from the blouse. I actually ended up interfacing the denim because it was too stretchy for my liking.

To cut the ‘ribbons’/ties from the blouse, I removed the darts.

Then I just cut long strips from the hem upwards. The blouse was cut on the bias and I liked the idea that the ties would have a small amount of stretch, for comfort when walking. I simply sewed the strips together to form two long strips, and then sewed them into two long tubes and pressed them.
I thought I would have loads of material, but there was actually very little left (below are the scraps).

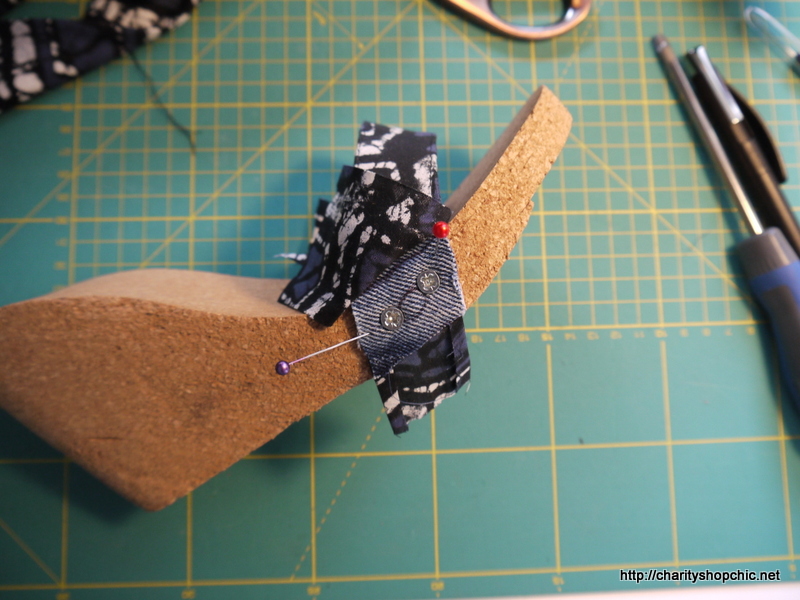
Covering the straps led to an interesting dilemma – how to hide the screws? After some thought, I decided the screws had to go through the denim layer but the fabric covering the straps could cover the screw heads as well.

This meant covering the denim with the fashion fabric only part of the way down, so the fashion fabric could be glued over the screws after they were fixed to the cork.


I sewed fashion fabric to the inside and outside of the straps, down to the part that will join the cork.


The toe straps are almost the same, except it’s the ends that are left free for screws. Note the large “seam allowance” at the ends which is folded under the sole.


I experimented with screws and some wine corks I had lying around and found that the screws went in easily with a hand screwdriver (no pilot hole or anything) and stayed in well. I did add a bit of glue underneath though (not all the way to the edge) just to be sure.
Then I folded the edges of the fashion fabric around the denim, trimming it where necessary. This was glued under by applying glue with a pin.

Same on the inside – two screws in each.

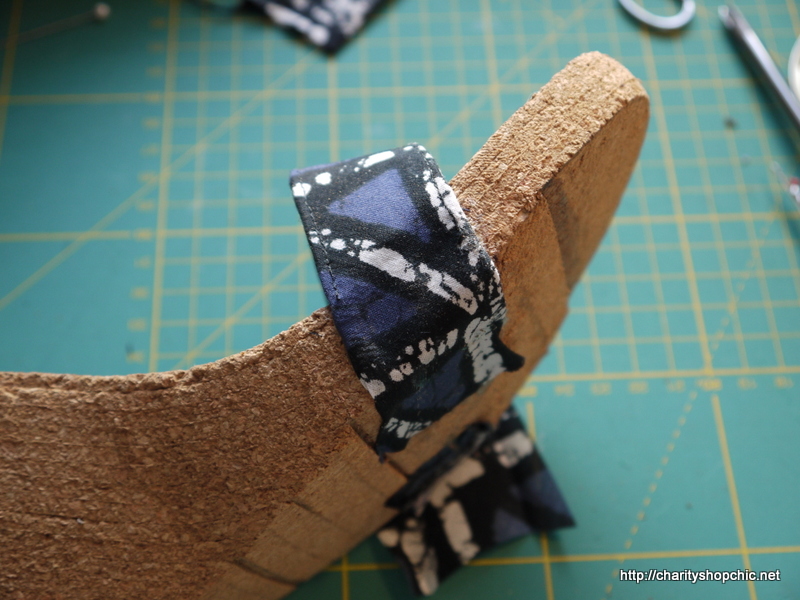
The heel pieces were glued on in the same way.

I put 6 screws in each, just to be sure!
Glueing the edges under was a bit more fiddly, but pins helped.

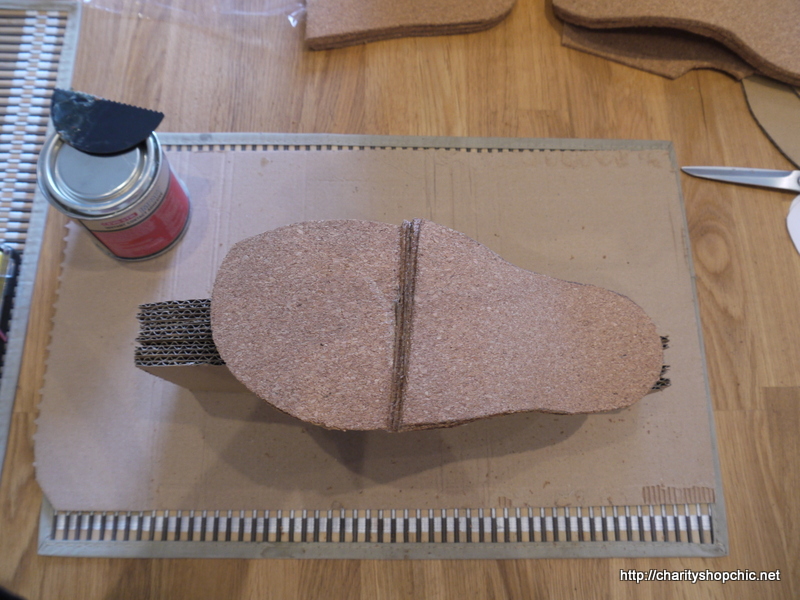
And finally – the black soles were glued on.

They looked so good at this point!

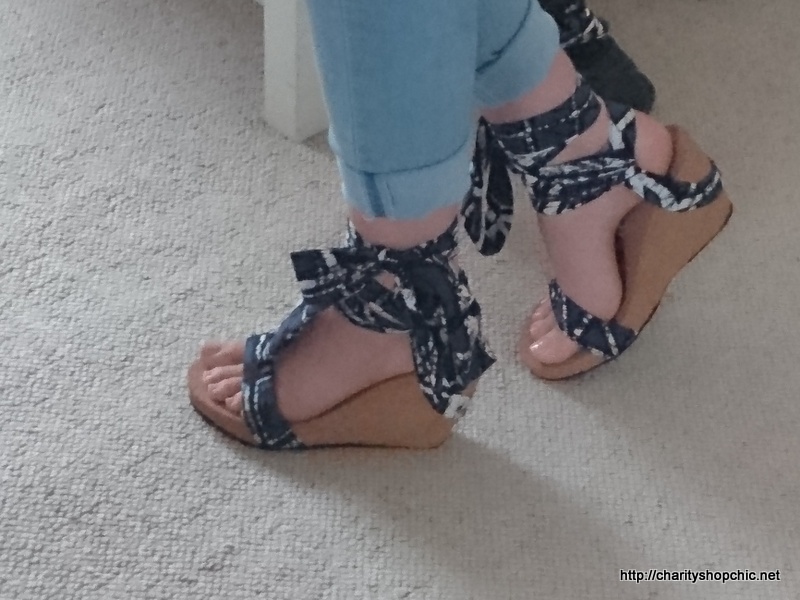
Here are a couple of blurry pics showing how I tied them. I tried them on just by threading the long ties through the heel piece and on top of my foot, and I liked it so much I decided it wasn’t really necessary to sew them on.

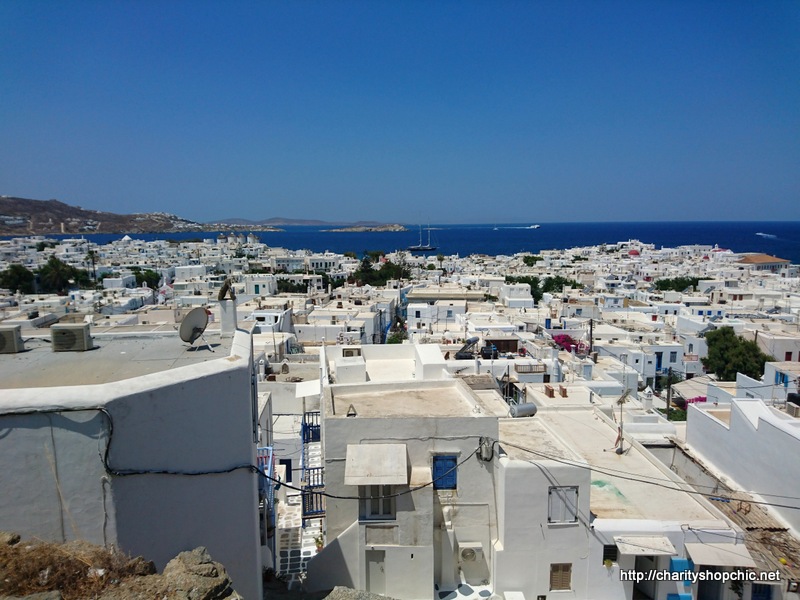
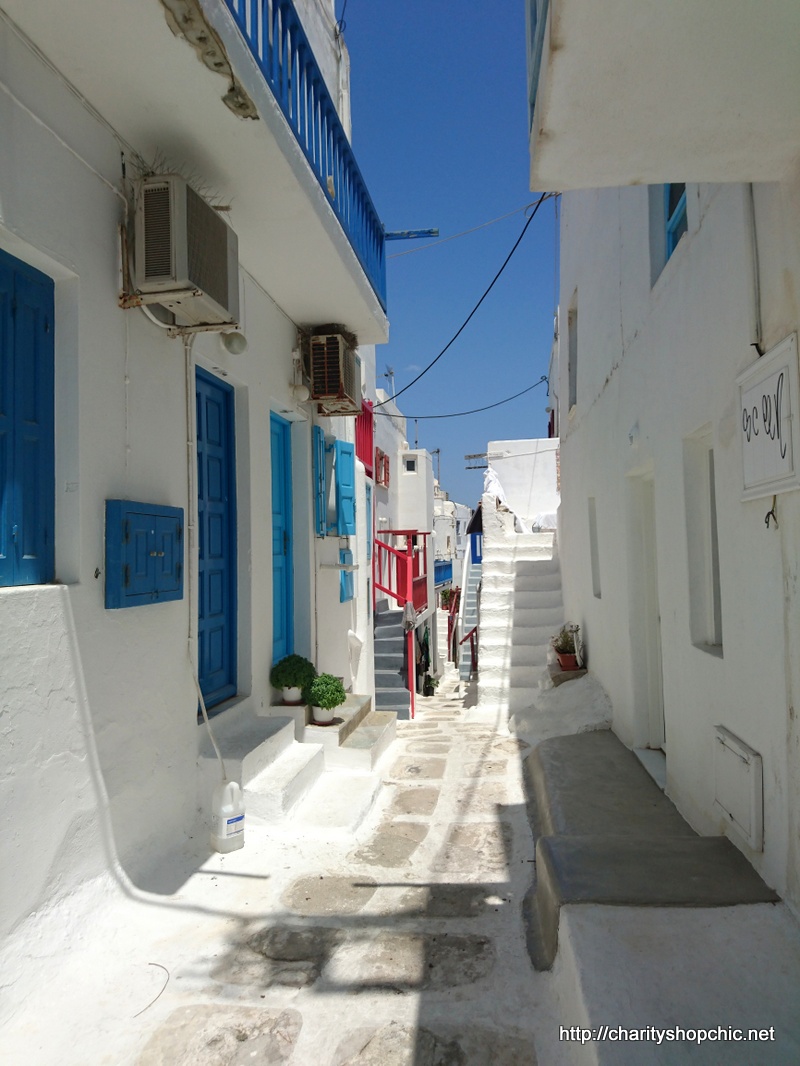
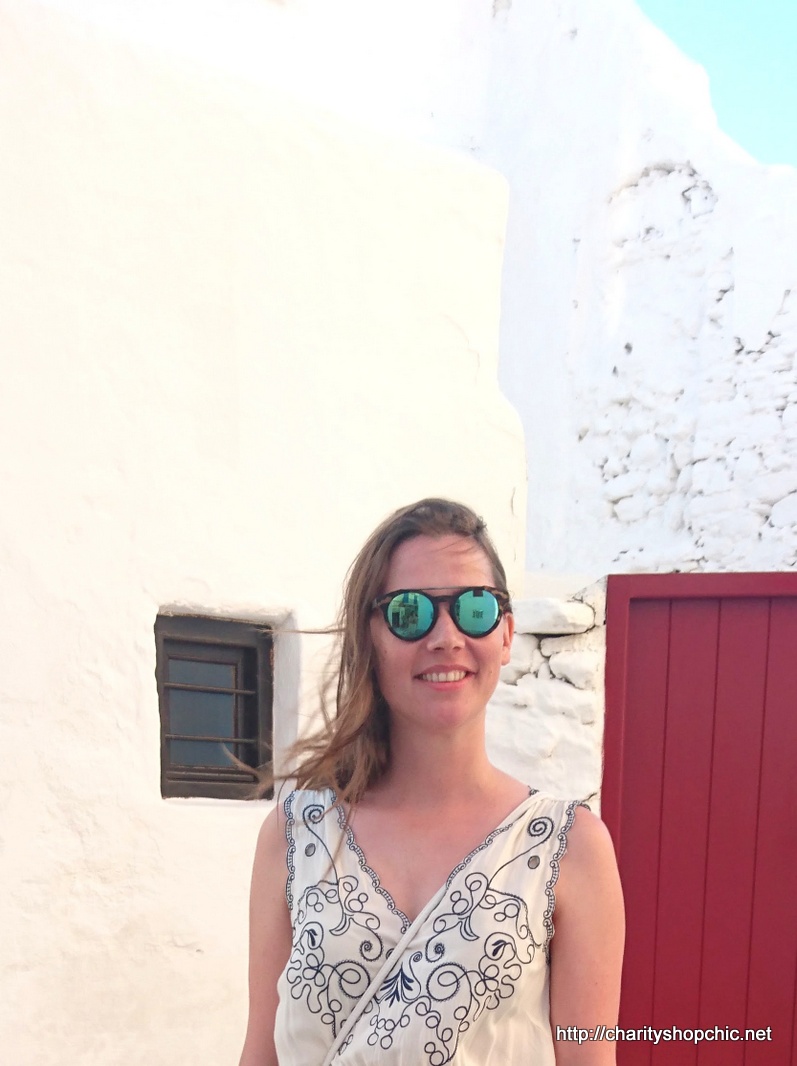
Of course these were the first things that went into my suitcase for my trip to Mykonos. The island is beautiful and I can verify it is exactly like you see in the postcards. The houses are white, the sky is blue, the sun is hot, the streets are narrow.


Pairing these with a short dress seemed best for the proportions as the ties go well above the ankle.

Excuse the hair. It was very windy!


Sadly there are only a few pictures of these shoes in their full glory…

..because this happened. Heartbreaking! The shoes were so lightweight and comfortable I pretty much forgot that I was supposed to be being careful, as this was after all their maiden voyage. So while I can attest to the fact that they withstood normal walking, even on steep gradients, and were almost unfeasibly comfortable, they were not strong enough to survive a full sprint across very uneven ground in a Greek building site at night (don’t ask). I stood on the edge of a concrete paved area with my toes on the soil below and the downward pressure from my toes broke the cork in half. Without any kind of insole, there was nothing to counter the bending forces in the unexpected direction, and it snapped. (Note that the breakage did not occur at the thinnest point, nor the point with the screws in, which I was worried might have been weakened).

While it wasn’t an entirely successful project, I remain hopeful that these can be fixed so I can continue to wear them. And it was certainly a great learning experience.

For example, I learned that the material I used for the sole would not stand much wear. I plan to acquire some kind of rubber matting to replace this part (Mr CSC suggested car footwell mats).

This has not put me off and I am determined that I will make my own beautiful shoes, somehow!

Wow!! So much work into just making the bases! I’ve been really tempted by making some shoes, too, though I love flats and have been eyeing up some Vibram soles on Etsy… You should talk to Joost, too – he’s made several (self taught!) pairs of leather shoes.
Yes, it was a lot of work, but a lot of fun doing something other than sewing for a change – I loved it! I saw Joost’s boots, they are incredible… he does have all the specialist kit I think, though. Never heard of Vibram, but will check it out, thanks!
I’m soooo impressed!!! They looked Amazing before theGreat Building site disaster!!
Thank you, Kezzie, I’m glad you liked them! Yes, it ended in disaster, but I’ll have to try and repair them somehow…
You did an incredible job !!! Even if the end of these shoes is sad ;)
BRAVO !!!
Thank you so much! The story is sad at this point, but the future may be a happy one – I will try and repair them!
You and Carolyn and the others make it look so easy! I suspect it is the opposite though!
how many hours do you reckon it took you from start to finish? What was the approx materials cost?
I wonder if next time you should glue the fabric in between the layers of cork? Or would that make the filing/shaping too difficult?
well done though, I’m so impressed by this!
We are talking about a LOT of hours here to construct and shape those cork bases, I didn’t keep track but it was very time consuming. As for the materials cost, the cork placemats were £3.50, the black placemat £1.70, the glue was about £6, and the fashion fabric was £4, a packet of screws that was about £2, plus some other bits from my stash. All in all about £15.
I am thinking about how to strengthen them and my instinct is the cork bases should be less flexible, not more flexible. I haven’t figured out exactly what to do yet!
They looked great! you looked awesome and thanks for your vacation photos.
Thanks! Glad you’re enjoying reading.
:-) Wow! Congratulations on your lovely shoes.
Sorry to hear they broke. But this was only your first pair.
I trust you’ll find a way to mend them.
And if not, then you’ll know next time how to improve them.
Learing by doing at its best.
Looking forward to seeing your next pair :-)
Thank you! You’re right, I am already learning from my mistakes and I am determined to get a wearable pair of shoes out of this…
Very impressive! And you should let Ikea know about ‘alternative’ uses for their products.
I’ve often found cork wedges aren’t solid cork all the way through, but rather cork applied to the outside of a light but strong material, usually a plastic of some sort. Maybe some layers of plastic, say cut from milk cartons or plastic drink bottles, slipped in between some of the cork?
Thanks Nicole, you’re right, so-called “cork” wedges are not really made from cork these days. I guess I thought they must have originally been cork at some time in the past! I like your milk carton idea, I like it a lot actually. Perhaps I will do some tests and see if it helps strengthen/stiffen the layers.
Sally, Sally! You have to inquire more about cork and its characteristics, if the wedges are from cork its for sure that are specially treated, of course the shoemakers have their tools, materials, glues, nails, even cardboards(?).Once I had removed the face of heels and glued it to flat sole, and of course soon they detached because I did not press them with clamp. So, You put an big effort and I am sorry that the nice wedges cracked! Good luck next time! p.s. at the same place cracked the polyurethane sole of my sandals with magnets which were made in Germany
Hi Mary, yes, modern “cork” shoes are made of plastic with a thin veneer of cork. I know now that this is for strength! I’m determined to repair this pair though, so stay tuned…
Reblogged this on vintagethrifter51.com and commented:
Amazing…all that work to make those gorgeous shoes!! I am heartbroken that they broke.
Me too… I am determined to repair them though!
Your technique looks pretty sound. However I think the cork needs to be a higher grade material, the kinda stuff used to seal champagne bottles should be stronger. Use the sole material for shoe repair for your soles and you can buy heel material in similar places.
I didn’t really think there would be different grades of cork, but perhaps you are right. I think the key will be inserting something to stiffen them up. Watch this space!
wow, incredibly impressed- fantastic job…. i wonder if you had used silicon (as in the sealer for baths) would it have made the cork more flexible? beautiful shape on those shoes
Thank you! I’m not sure whether more flexibility would have helped – my feeling is they should have been less flexible so they didn’t bend as much. I’ll have to investigate various different materials and see what I can come up with!
How cool is this!?!?!?! :D
Haha, thanks Helga!
these looked amazing – i love the fact that you dived in! could have have added something like a metal strengthener inside the cork layers? Even one of the those metal plates with holes in you get for screwing things together. like this:
http://www.diy.com/departments/silver-effect-steel-mini-bracket/243261_BQ.prd (L shape maybe to strengthen inside the wedge)
http://www.diy.com/departments/abru-brown-steel-perforated-plate-l160mm/251054_BQ.prd
Yes, I think they definitely need some kind of strengthening layer, I just haven’t quite found the right thing yet. I think the best thing would be some kind of hard/tough plastic as it would be lightweight, but I’ll have to study the objects in my house and see if any of them fit the bill…
Thanks for all the process photos! What if you glued them back together (with barge?) and glued leather insoles on top? I wonder if that would provide enough stability to keep them in action.
Hi Angela, I think insoles are definitely going to be a feature of the second generation shoes! I will keep you posted.
love how these turned out – I’ve been tempted to try out shoemaking but like you found the commitment to tools and courses a bit daunting! I highly recommend following rachelseessnailshoes on Instagram- if she did courses in the UK I’d be there in a heartbeat! I wonder if coating the cork with something would make them stronger? It’s frustrating, but the best way to learn things is of course by trial and failure!
Hi Charlotte, thanks for the recommendation on rachelseessnailshoes, plenty of (sandal) eye candy there! You’re right, I’m learning a lot by trying and failing, and I am having fun in the process. I did think about varnishing them to see if it would help protect them against water, but let’s face it, I am not going to be wearing these in the rain!
Wow Sally! My jaw was dropping open as I read this! These must have taken you ages but they look amazing!! It’s such a shame that they broke but I’m sure you can fix them. I am a big fan of the old eve stick, we use it at work to repair shoes alllll the time!
Haha, yes it did take ages, but I enjoyed it! Evo stick is brilliant stuff, I’m going to glue the offending shoe back together and try and add some kind of strengthening layer and an insole, then see if they are strong enough! Determined to make it happen!
What an amazing project! You could try a spokeshave to shape them next time, it might save time and mess? I was so sad to see the broken shoe, but I’m sure you’ll find a way to save it – a piece of dowel inserted through the middle horizontally? Anyway, I look forward to more shoe adventures!
Hi Sue, great idea on the spokeshave, I don’t have one but I could get one… I am determined to make these ones wearable again in the mean time!
How have your wooden shoes held up with use? I may try clogs next, if I can lay my hands on some tools.
My shoes have held up well but the bottoms are really slippery. My problem with them is that I can only use locally sourced materials and we don’t produce rubber! Currently experimenting with tree resin…
I cant believe you do that !! i must try it !!!! Good and nice job !
Sade it’s broken but I belive you’ll find a solution for do some stonger new or repair it !
Haha, maybe wait until I can figure out how to strengthen the cork bases before you try it! I will definitely repair these ones. Thanks for reading!
You are so clever and so determined – I would never have thought of trying to make my own shoes and I’m not sure I’d have the patience or persistence. Well done!!!
Thanks Kate, it’s very different from sewing but I am determined to make it happen!
They look amazing! Well done, shame about their demise but what an incredible project.
Thanks Bec – glad you liked them!
Has any one told you that you are amazing? Is there anything you won’t tackle? What a shame these great looking shoes broke but I am sure you will figure out how to rectify that. I look forward to seeing your next project.
Haha, thank you very much! There is pretty much nothing I won’t attempt in terms of crafting, it’s good to keep things interesting by trying new projects, I think!
Love this! I’ve always dreamt of making shoes and after seeing this I might just have to give it a try!!!
Thanks Kristina, you should definitely try it! Although they didn’t last long, they were fun to make and wear!
So ambitious! The only time I saw anybody make shoes was on Project Accessory, a one-off spinoff from Project Runway. I have just recently tried spray painting some shoes from the thrift store. That’s the extent of my shoe ambition. :-)
Thanks for commenting! I love the idea of painting or dying shoes… or adding shoe clips!
Don’t most purchased sandals (not flip-flops) have a leather piece that makes contact with your foot? I always assumed the purpose of that was to keep things natural, and thus discourage that awful smelly bacteria that can result from man-made materials. Maybe it is for strength?
They were pretty. Nice job for a first try.
Yes, there should be an insole of some kind. And my plan is to try and add something under the insole to strengthen the cork. Watch this space!
Reblogged this on Shallow Thinking.
Thanks for the reblog!
I saw an ad for boot glue recently & thought it might be worth a try on your cork wedges. Such a shame that they broke since they were such a stunning accomplishment.
Thanks Maria – I am determined to repair these!
wow, such a lot of work, I applaud you for even trying that! And I love the looks of it!
About the snapping, I think the problem is that cork is quite strong, but also quite prone to snapping, because of its granular ( is that the correct term?) structure, There isn’t a lot of internal structural integrity, so it rather breaks than bends.
Having dismantled my own espradrilles once, I noticed that there was a thin strip of metal hidden in them. I don’t think it did a lot in terms of strength ( if was fairly thin) but because it is glued to the other layers, the cork just doesn’t get enough “room” to snap. Maybe even a few layers of other material in between the cork ( fabric?) might do the trick: the fabric won’t break with the cork, so the next layers of cork don’t have enough space to continue the breaking line.
So that would be my solution, also for repairing them!
ps: for the work: see if you can borrow some electrical equipment ( saw and sanding equipment),it might make the job a bit easier too. ;)
Apart from that: one of my favourite projects so far!
hugs!
Hello! Yes, the cork needs to be strengthened with some kind of intermediate strength layers, I think. For this particular pair, I will add layers on the top and bottom and try to strengthen them that way. For the next pair, yes, some proper tools would probably help, but I wanted to prove it could be done with the bare minimum ;-)
Thanks for your support!
hello there, at least a platform which inspires you the most, is the finished product which was your aim, it is such an experience especially when you giggling telling a friend what you wearing you did it your self. nice experience. it’s fun.
AMAZING. found this in my obsessive googling for cork insoles. (I made a pair of birks last year out of genuine birkenstock footbeds and a sheet of soling material…but I want more options!) Thanks for showing all your steps.
I found myself stuck in a cycle that had no end to it,I knew I needed to break out of that matrix or watch all I have ever worked for go down the drain all for nothing . The setbacks & mountainous taxes I faced in the later stages of my investment while trying to withdraw my assets, I vividly recall experiencing none of that in the earlier rounds when I started investing.Despite being faced with these abrupt taxes which I willingly paid hoping that my withdrawal process will be approved.Withdrawing my trading gains turned from a walk in the park to nothing but a disappointing & frustrating experience filled with unending commission and denied withdrawals altogether.This could have gone on until I was bankrupt or worse homeless in the streets, it breaks my heart When I remember how lost & broken I felt upon discovering the investment company was fraudulent because I always thought I knew better & not the type to fall victim to such. Finding yourself in such situation and not knowing what to do or where to begin your search for a solution to get your invested asset out is an experience and a feeling that not just anyone understands,”it’s like a been there done that kind of situation”, drowning in your own pool of regrets & self blame while battling the thoughts of the possible loss of your whole investment . I Searched high & low and left no stone unturned in my quest for assistance,I faced countless disappointment from firms & institution I thought I could rely on, not to mention the discouragements from friends & family who wanted me to give up on my search and consider damage control, instead of trying to recover what I lost as it was clearly costing me more & taking it’s toll on my overall wellbeing, but of course I paid no attention to the negative comments.
And it’s not until I tried and tried and tried again did my search lead me to “VALOR HACK RECOVERY TEAM”. Valor Team handled my request & complaint with ease and ethics that I have never seen before in my life , after “VALOR TEAM’S” interception in my case my idea of possibilities heightened. My newly found awareness towards Investments & “Investment Frauds” gave me the push to share my experience in an attempt to help the next victim who is probably going through the same emotional rollercoaster of uncertainty and failed expectation from sources they trusted ,to search no further but head straight to a Renowned & Legit asset recovery company “VALOR HACK RECOVERY TEAM” , because this team in question worked round the clock to ensure my invested asset were pulled from the fraudulent investment company. It became clear to me after getting scammed that it’s no news anymore to loose money through an investment scam ,it has become a widespread problem that’s eating deep into the savings account of my fellow Americans and the world at large and it’s high time we fight fire with fire. Fighting Fraud, Fraud prevention, detection & Asset recovery works better when everyone that has ever come in contact with “Valor team” and can attest to the company’s authenticity(who ) also understands how this team works, to go Public make & it an obligation to educate your family, team, anyone & everyone within your reach (the next victim or the world in general) to use a trusted Asset Recovery Solution like “VALOR HACK RECOVERY TEAM” to identify problems/foul play in any investment or business deal they wish to venture in to. Delegate tasks like this to the right experts – VALOR HACK TEAM- they can detect & deal with any red flags raised by the investment company that you are already investing with or about to invest in, with their expert insight in fraud detection system.
Below are the means of contact that I’m aware of ;
• ⁃ Telegram: Valorhaq_HQ