
Embellishment: Ruffles
Do ruffles count as an embellishment? In my book, they do!
I’m sure you’ve noticed that the pie crust blouse is back in fashion at the moment. Well, the joke’s on me, after cutting that one up that time. Anyway, here’s how the reverse transformation can be done. I’ve seen a few of these tutorials online but here is my version of it.
Take one vintage blouse that looks as though someone maybe wore it to escape from the circus…

Fun fact – I actually bought this on the same day I bought the pie crust blouse that I cut up, so it’s been in stash for a while. It’s from the Swedish Red Cross (Röda Korset) shop in Jörn, on my trip to Northern Sweden. I paid SEK30:- (about £2.50).

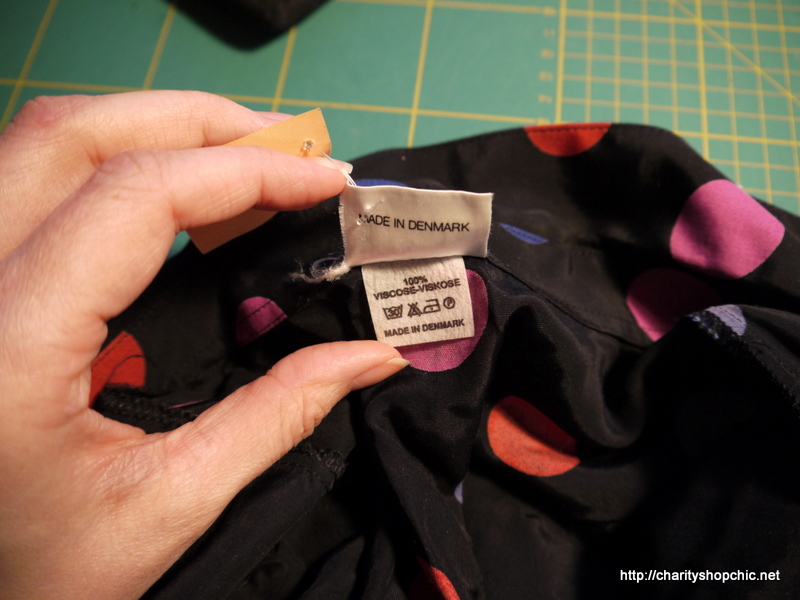
The blouse is 100% viscose so it’s a lightweight flowing shirt, made in Denmark.
It had humongous foam shoulder pads, which were the first thing to go.

Look at the buttons!

They are alternating pink and blue, plastic, and around the same size and colour as the dots on the fabric. I think this adds to the clownish effect but I do love them.

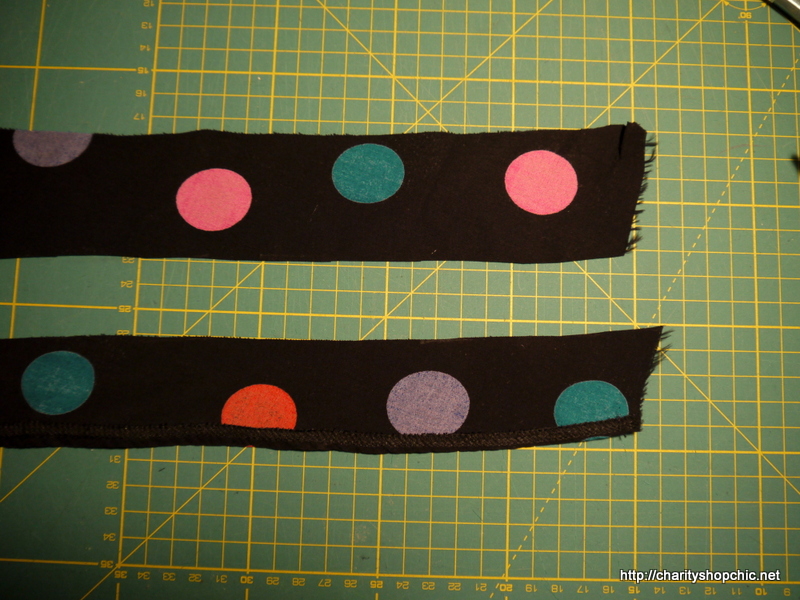
To make my ruffle, I cut a decent strip off the hem of the blouse all the way around, about 10cm.

I cut the strip in half lengthways – or almost in half. The unhemmed half is a bit longer to allow for a hem. I sewed the strips together to make one very long dotty ribbon.
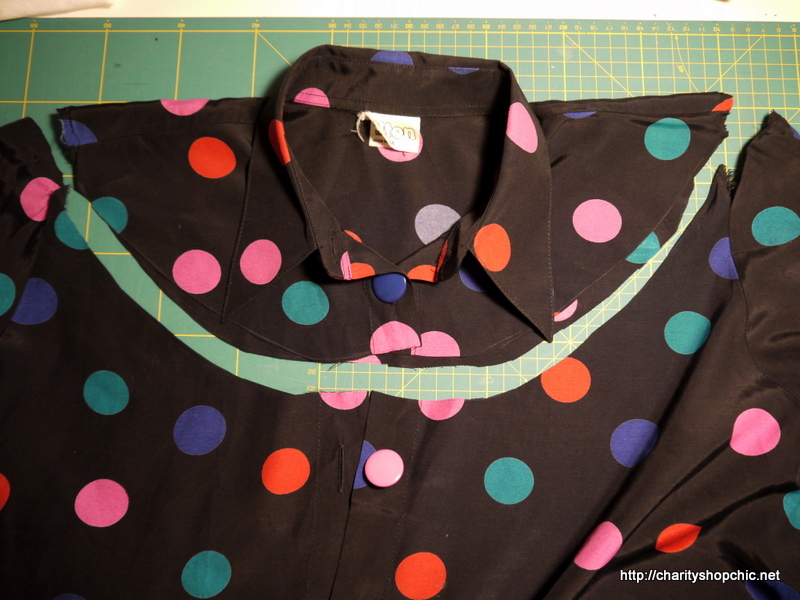
To make a space for the ruffles to be sewn to, I unpicked the shoulder seam a bit, and continued the line down in a curve towards the centre front. I drew a similar curve on the back.

Here’s how it looked after cutting.
Next, I hemmed the unhemmed ruffles with a very narrow hem, and then I gathered the other edge very tightly.
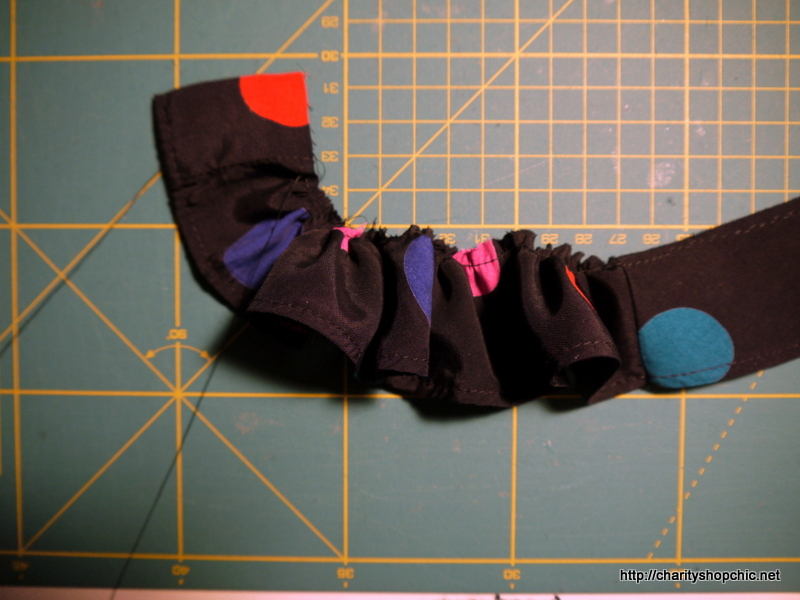
It was a bit of a pain to manage as it was very long and kept getting twisted up.

I wrestled it into shape and pinned it to the top portion of the blouse.
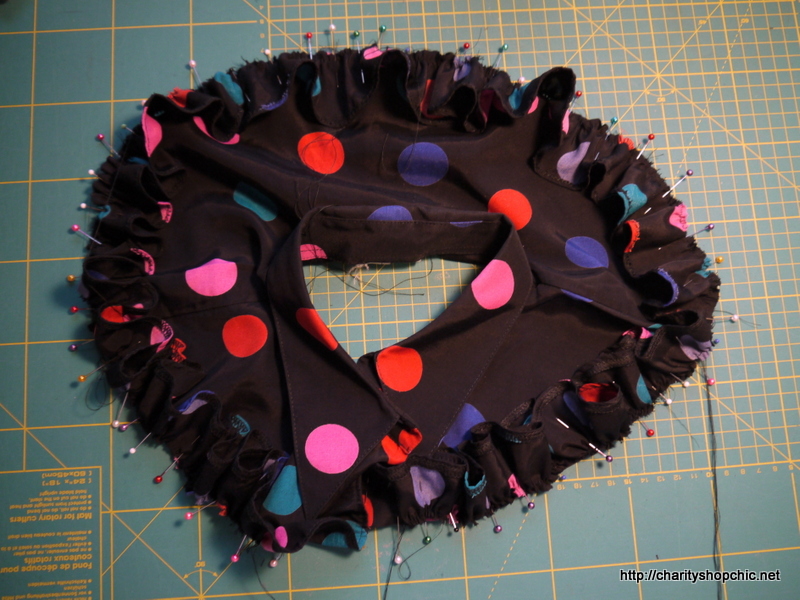
Basting it to the one layer before sewing the seam was a necessity as it was just so hard to manage.

Still, the ruffles were looking suitably ruffly!

Of course, the next thing to do was to sew the bottom part of the shirt back on. I used a tiny 5mm seam allowance so as not to remove more length from the blouse than was absolutely necessary, as it was already quite short. The finished ruffles are about 3cm deep.
Note that I kept the centre front/placket parts at the centre front, and I kept the plackets unruffled so I could button up my blouse nicely. Unfortunately, one button had to be lost as it was in the portion that was cut off the bottom – don’t worry, I’m saving it for a suitable project.

The final effect was more than a little “80s kids TV presenter” so I headed to Shoreditch in an attempt to blend in. Here I am at outdoor eating sensation Dinerama enjoying a couple of glasses of bubbly in the springtime sunshine (clowning around?). Somehow, the sleeves are a little short, but as I tend to wear them rolled up anyway, it’s not much of an issue.


This is freaking cute! I love what you did with it! It doesn’t even look the same!
Thank you! I think the ruffles and the shorter hem changed the proportions of it, it does look very different.
you are so clever! That looks great!
Thanks, Kathryn! I love wearing this!
Oh my word this is such a good idea. Love it.
Thank you, glad you liked it!
This could be something from one of Marc Jacobs last collections! Good work!
Thanks Nicole, I’m going to try and imagine the catwalk/runway rather than the circus/big top when I wear it!
I love those dots and the buttons, but your refashion? Amazing!
Thanks, Sue! It’s a bit ‘out there’ but I think it’s a lot of fun!
Always great when you can alter a plain style into something so cute. Nice work!
Thanks for your support, Linda!
Awesome!
Thanks, Stephanie!
lovely retro!
Thank you, Mary! :-)
I found myself stuck in a cycle that had no end to it,I knew I needed to break out of that matrix or watch all I have ever worked for go down the drain all for nothing . The setbacks & mountainous taxes I faced in the later stages of my investment while trying to withdraw my assets, I vividly recall experiencing none of that in the earlier rounds when I started investing.Despite being faced with these abrupt taxes which I willingly paid hoping that my withdrawal process will be approved.Withdrawing my trading gains turned from a walk in the park to nothing but a disappointing & frustrating experience filled with unending commission and denied withdrawals altogether.This could have gone on until I was bankrupt or worse homeless in the streets, it breaks my heart When I remember how lost & broken I felt upon discovering the investment company was fraudulent because I always thought I knew better & not the type to fall victim to such. Finding yourself in such situation and not knowing what to do or where to begin your search for a solution to get your invested asset out is an experience and a feeling that not just anyone understands,”it’s like a been there done that kind of situation”, drowning in your own pool of regrets & self blame while battling the thoughts of the possible loss of your whole investment . I Searched high & low and left no stone unturned in my quest for assistance,I faced countless disappointment from firms & institution I thought I could rely on, not to mention the discouragements from friends & family who wanted me to give up on my search and consider damage control, instead of trying to recover what I lost as it was clearly costing me more & taking it’s toll on my overall wellbeing, but of course I paid no attention to the negative comments.
And it’s not until I tried and tried and tried again did my search lead me to “VALOR HACK RECOVERY TEAM”. Valor Team handled my request & complaint with ease and ethics that I have never seen before in my life , after “VALOR TEAM’S” interception in my case my idea of possibilities heightened. My newly found awareness towards Investments & “Investment Frauds” gave me the push to share my experience in an attempt to help the next victim who is probably going through the same emotional rollercoaster of uncertainty and failed expectation from sources they trusted ,to search no further but head straight to a Renowned & Legit asset recovery company “VALOR HACK RECOVERY TEAM” , because this team in question worked round the clock to ensure my invested asset were pulled from the fraudulent investment company. It became clear to me after getting scammed that it’s no news anymore to loose money through an investment scam ,it has become a widespread problem that’s eating deep into the savings account of my fellow Americans and the world at large and it’s high time we fight fire with fire. Fighting Fraud, Fraud prevention, detection & Asset recovery works better when everyone that has ever come in contact with “Valor team” and can attest to the company’s authenticity(who ) also understands how this team works, to go Public make & it an obligation to educate your family, team, anyone & everyone within your reach (the next victim or the world in general) to use a trusted Asset Recovery Solution like “VALOR HACK RECOVERY TEAM” to identify problems/foul play in any investment or business deal they wish to venture in to. Delegate tasks like this to the right experts – VALOR HACK TEAM- they can detect & deal with any red flags raised by the investment company that you are already investing with or about to invest in, with their expert insight in fraud detection system.
Below are the means of contact that I’m aware of ;
• ⁃ Telegram: Valorhaq_HQ
It may be a traumatic experience to the victim of an online investment fraud, however preventing & protecting oneself against any possible scams in the future involves the improvement of one’s financial knowledge & the safety protocols of the reliable asset recovery platform whom he/she has chosen . Become aware with basic tips that may help one avoid being conned, like attractively high and low risk assurance of high returns and high pressure to invest. In my time of despair & regrets,I had no guidance or article that suggested ‘hackers’ as a way out, so if I were you I’d consider this piece of information ‘vital’. In spite of the emotional & financial damage I battled with mentally, i still managed to make a legal report to the cryptocurrency regulatory authority within my jurisdiction; who then pointed me to “VALOR HACK RECOVERY TEAM ” direction as an off the book guaranteed solution to my report.
Contact info:
You’ll thank me later for the heads up…
The truth is, at the end of the day we fail to realize there’s more luck involved in our success and failure than many people are willing to admit. So it goes,I’m putting this out here because I expect my experience to serve as a light in any tunnel of fraud we investors face or find ourselves in, out here, in the course of doubling what we have saved up for a better retirement plan. In everything we do, lets endeavor to pay attention to the role we play in in our suffering too, either for accountability & resolution or just to ensure you recognize how your own thoughts and actions led you here/got you involved with fraud (as much as the actions of others) , so that each financial decisions you choose to make now or moving forward after your engagement with “VALOR HACK RECOVERY TEAM” is not influenced by greed, poverty, fear of missing or pure manipulation over your gullibility on any get rich quick schemes/Investments. Yes !, at first glance your current financial struggles appear to be the fault of someone or something else and that same someone or something else just may be why you lost your job or why your 980k worth of assets is locked/frozen & probably no longer controlled by you while in reality it was you all along. Take an honest look at your current financial situation and ask yourself, “How and why did this happen?” The purpose of analyzing what led you to this point is to be objective and learn as much as you can – not necessarily to place blame. Make it a habit to pause & question your actions each time you find yourself doing too much, don’t just stop there, evaluate every online engagements with any investment company or scheme that promises quick wealth starting now . Analyze every market ads & investment packages for signs of fraud during your onboarding process with the investment company/business you wish to jump on. Unrestricted transparency of any financial institutions or investment company should be your cue for safety over your assets & even when searching for asset recovery assistance your priority also should be legitimacy . Investment frauds are commonly identified by offers of tiny or no-risk investments, guaranteed returns, consistent profits, complicated methods, or unregistered securities and for those wondering what an investment scam is or how to to know for sure their investment is legitimate; I personally believe one can spot an investment scam from their deceptive strategy when they are targeting unsuspecting individuals, by luring them to part with their money with the promise of high returns, which is a widely known phrase amongst investors ( Returns that are too good to be true ). At first glance, these scams can look and sound completely legitimate. They often come armed with an array of convincing tools: sleek websites, glowing testimonials, and professional-grade marketing materials, all designed to instill trust and credibility. Gone are the days of easily spotted, amateurish attempts. Now, scams can weave intricate webs of deceit, harnessing the latest technology and psychological tactics to appear genuine. The digital age has given these scammers a broader platform and a more extensive reach, allowing them to target potential victims globally. What’s even more alarming is the level of sophistication some of these scams have reached. So much so that even seasoned professional investors with years of experience in the field have been duped. This few tips & facts alone underscores the importance of vigilance and due diligence in any investment venture & the need for “VALOR HACK RECOVERY TEAM” expertise.