
Wedding Dress: Part 6 (The Veil)
Let’s talk veils! There was no doubt in my mind that I wanted a veil, and I quickly earmarked the kind of thing I was looking for (white, long, nothing that comes over the face). Here are some of the images I was working from.


Since I had to give up the idea of embellishing the dress because of time constraints, I thought it would be safe to play around with embroidering the veil and making a jeweled ornament for the comb – both could be abandoned at any point and a plain veil made in half an hour, if the deadline got too close.
Since my wedding motif was a star, stars were the obvious choice for the embroidery. I did quite a few samples, trying to make a star shape that looked as good on the front as it did on the back, which turned out to be tricky – the veil is of course seen from both the inside and the outside, so it was important that the reverse looked good. Also, there couldn’t be any stitches on the reverse outside the shape of the star, because the veil tulle is of course see through, so they wouldn’t be hidden. I considered this star stitch before dismissing it because thread showed through to the right side between the points of the star. What I eventually settled on was a modified raised fishbone stitch, times five for each star. I don’t mind telling you I got halfway through doing these stars in pink before deciding it was too harsh against the white dress and switched to silver. Metallic thread was not terribly easy to work with, so I ended up with a satin grey.
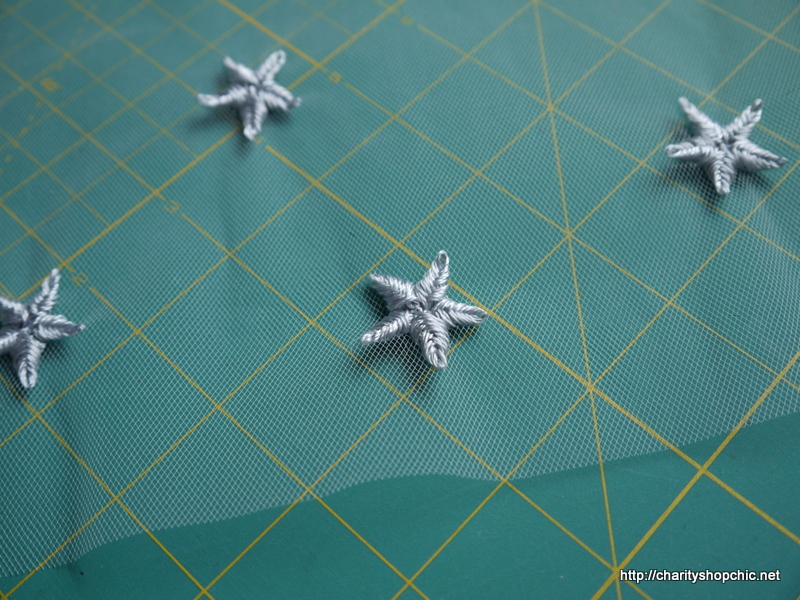
Here’s a closeup of the finished stars.
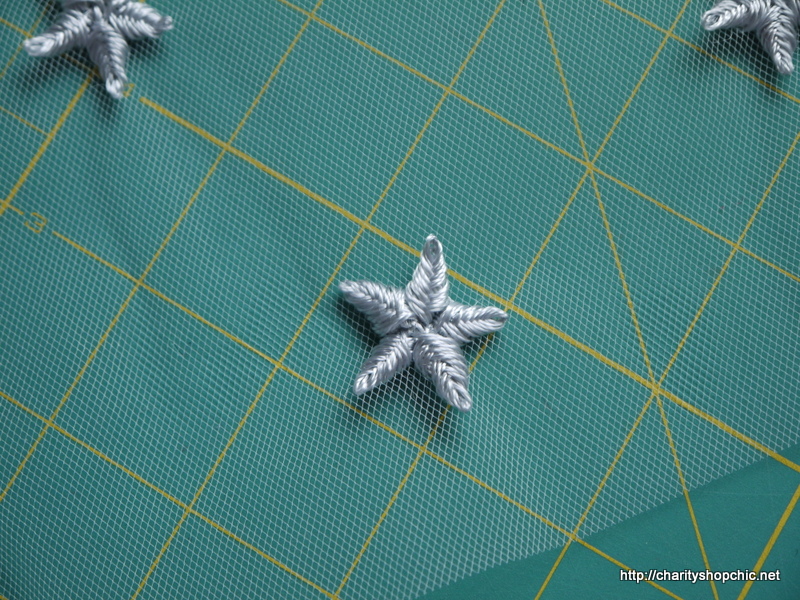
And this is what the back looks like – not perfect but they still look like stars!
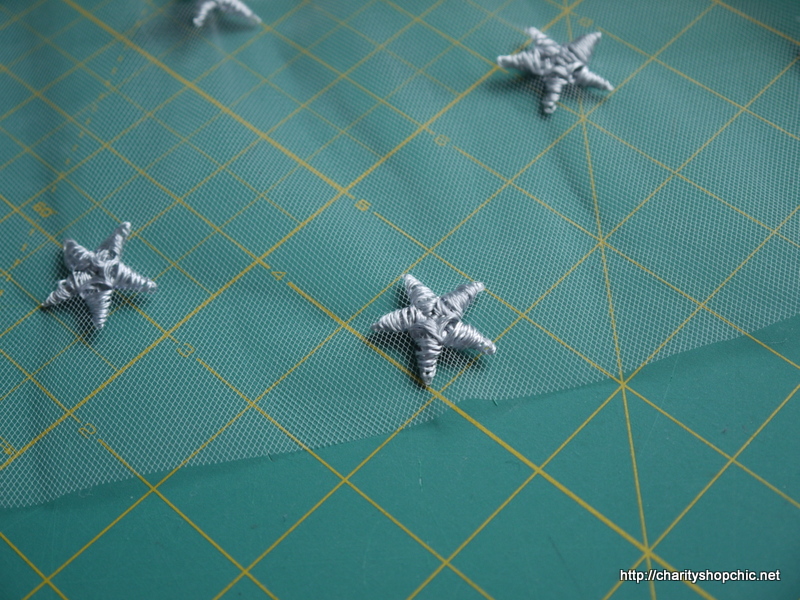
I embroidered my stars along the bottom of the veil in a random pattern. The length of the veil had to be decided at this point. After considering everything from shoulder length to floor length, I settled on having it a little longer than fingertip length, around the fullest part of the dress.

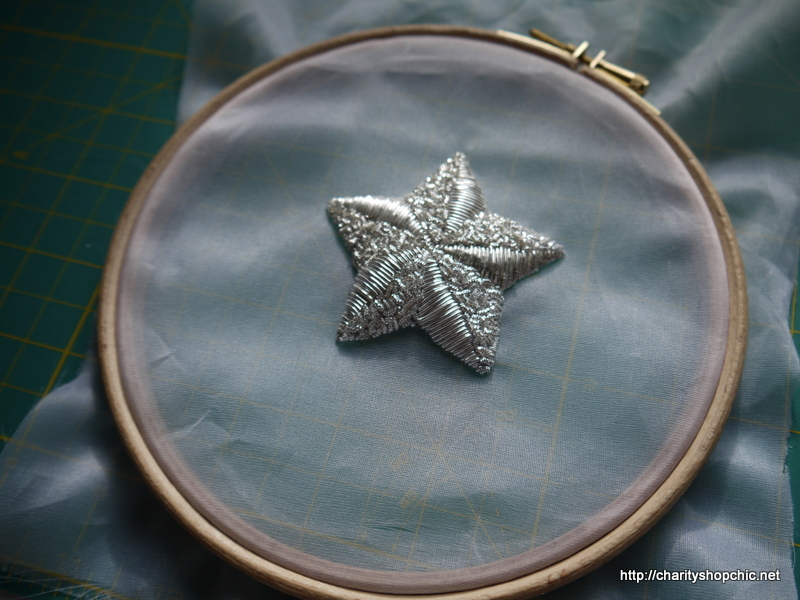
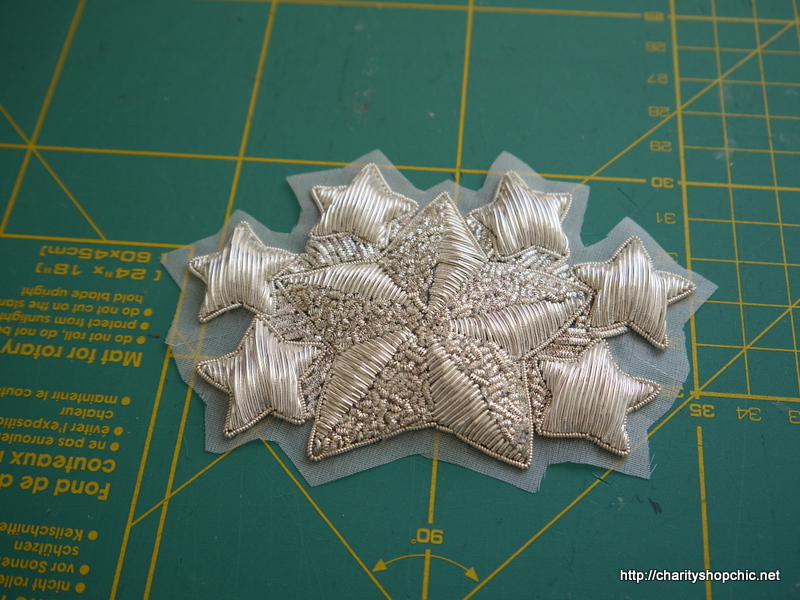
For the jewelled ornament, I turned to one of my favourite techniques – goldwork. I know we’ve talked about this before, but as a reminder, it’s the technique used on military badges which uses metal threads. Most goldwork threads are actually thin pieces of metal foil or wire wound tightly around something, and then the mould removed – so it’s like spring with the coils touching. You cut pieces off and sew it to the substrate, like beads. It’s extremely time consuming because (1) each piece has to be measured individually before cutting, (2) the pieces are absolutely tiny, and (3) the pieces are so soft that you can damage them by cutting them or touching them in the wrong way, and then you have to cut a new piece – so it all has to be done extremely carefully.
After working on a few samples, here’s the one I liked best. This is smooth purl (the foil ‘springs’) and small chips of bright check, which is the glittery stuff, sewn on in random directions.

The grey material is padding to give the piece a raised effect (I actually used some scraps of sweatshirting for this, because I was not originally planning for this to be in the final ornament).

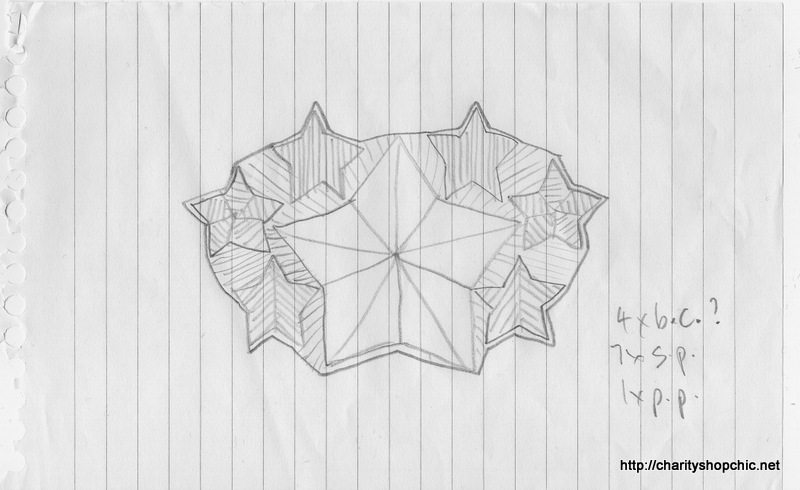
Here’s my rough sketch of the ornament based on the above sample.
The padding for the small stars was made from layers of craft felt.

Each star had three layers – you cut them all the same, then trim one batch a tiny bit, then trim a third batch a bit more.

Then they get sewn together one on top of the other. So the padding is rounded at the edges.

Just as a reminder of how small they are… not much bigger than my fingernail.

And the pieces you have to sew on – a few millimetres, max.

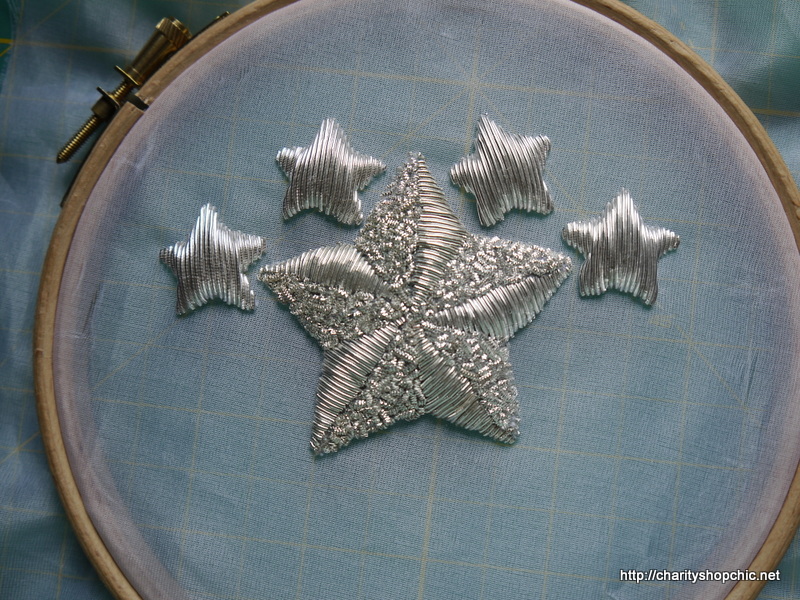
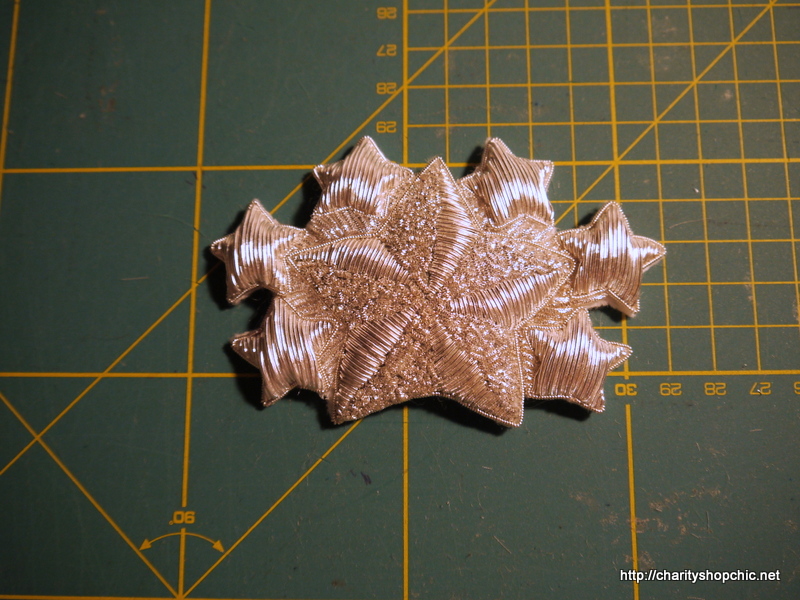
After some hours, the central star was finished and it was time to start working on the little stars.

Once I started, I liked the look of all vertical pieces of smooth purl, so I made them all the same.
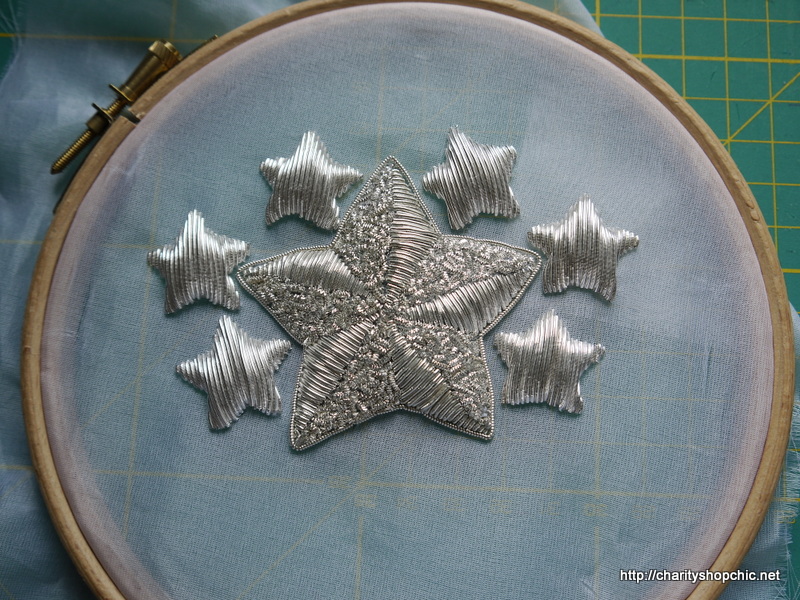
I was pretty happy at this point – I love it when a plan comes together!

I added outlining in pearl purl to make them stand out.


Then I filled in the area between the stars with bright check (I only had bright check and smooth purl at my disposal).

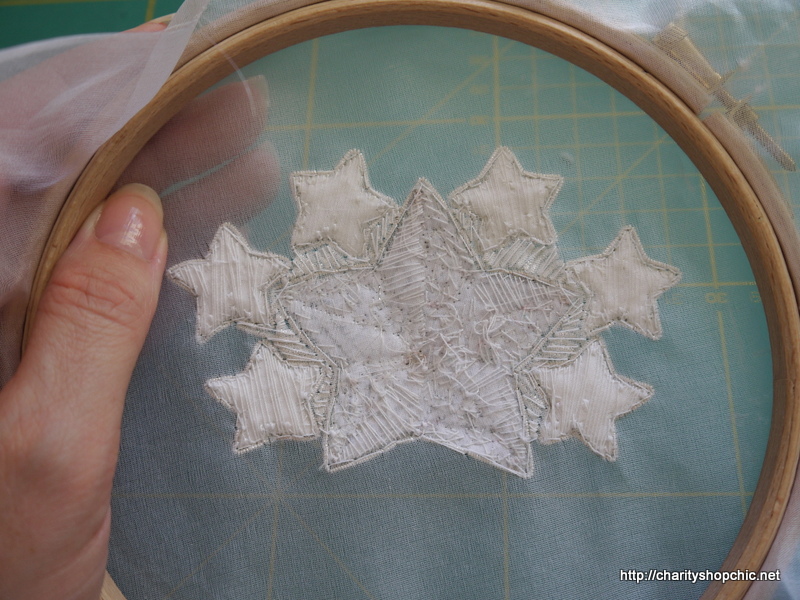
Here’s a view of the back, if you’re interested.
Very, very carefully I cut around the shape leaving an allowance of organza which I clipped the corners of, and finger pressed under.
I sewed the whole thing to a felt patch (gingerly – you can damage it with a careless fingernail).

Then the whole thing could be sewn on to the comb.
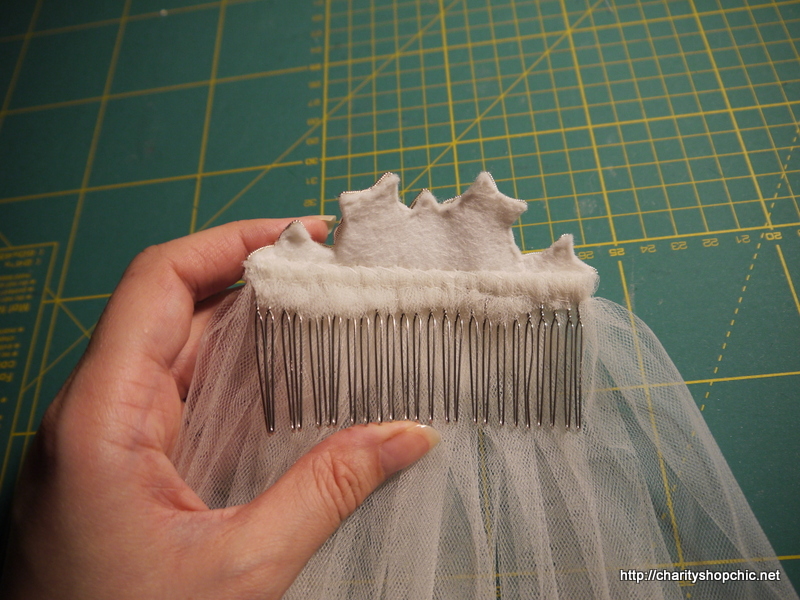

Ta-da!

I hope you’re still reading, because next post is the BIG REVEAL!!!

I am staggered by the amount of detail you put into this. I love what you’ve done here and cannot wait for the big reveal!
Well, if you can’t go into an excessive amount of detail on your wedding dress, when can you? ;-) Big reveal coming soon!
I am truly amazed by your craftsmanship! Truly breathtaking! I cannot WAIT for the reveal!x
Thanks Kezzie, the big reveal will be up in a few days!
Ahhh you are amazing!
Thank you so much, Naomi! And thanks for reading.
A. Mazing!!!!!
Thank you, Kellie! :)
WOAH.
That is all.
Thanks Jenny – there is a lot of hours’ work in this sucker…
I haven’t done goldwork for several years, love the finished effect. Definitely a beautiful heirloom!
Thanks Jules, you are very kind! I love the effect goldwork produces but it’s really fiddly and time consuming that I haven’t always got the patience ;-)
Wow! Everything I’ve seen so far is amazing!
Thanks so much, Claire! I appreciate your comment.
Wow, that’s amazing! Your so talented, not just to go it, but to have the vision to do it to 😃
Your talents BLOW MY MIND!
HAHA, thanks Teri – you are too kind!
Oh, and, YES! I’m still reading……Cannot wait until the reveal!
Heh, I wondered whether everyone would be bored with it by now… big reveal in a few days, stay tuned!
Fabulous!!!!!!!!!!!
Thanks Amy, and thanks for reading!
Oh, wow! This must have taken so much time and work! The result is great! I haven’t decided whether I’ll make a veil or not. I probably won’t, but this goldwork embroidery looks tempting!
It is of course completely your decision, but… I couldn’t pass up the opportunity to have a veil – there are so few chances to wear one in life. And it is part of the fun of being a bride, if you ask me! If you don’t fancy a big one like mine there are loads of different types to choose from, and you can make one quickly if you change your mind! Nudge, nudge! ;-)
I was actually holding my breath while I read that in case something went wrong after all that work!! Can’t wait for the big reveal!
Eek, sorry! I did rework the small star embroideries in a different colour after doing half of them, but nothing really went majorly wrong. Unless you count having to unpick some of them after sewing them on the wrong side, oops!
Loving it all! But especially love the look of the stars on the veil against the dress. Can’t wait!
Thanks Joss, I couldn’t resist a picture of the stars against the fabric. Such a good combination ;-)
Ha ha, until I read JaneyB’s comment I hadn’t realised that I was still holding my breath! Incredible!
HAHA, breathe, breathe!! Thanks for reading, Jglzrz!
Beautiful work! Congratulations! Thank you for sharing your exciting journey, love the detail of the work required, a fantastic effort! :-)
Thank you Jillian, I appreciate your comment. It took so many hours to get this done but I was really pleased with how it turned out.
I have never seen that kind of embroidery before, it is incredible. So looking forward to your posts. Jo x
Thanks Jo, goldwork is a bit obscure but I think the results are beautiful.
Reblogged this on vintagethrifter51.com and commented:
So beautiful, I can’t believe all the work you put in, but it was so worth it. Congratulations on your dress, your veil and your wedding.
Thank you so much vintage51, it was a lot of work but I’m so thrilled with how the final veil turned out. Final pictures will be up in a few days!
So much tiny detail work! I feel like a slug for just buying a dress. I love the star comb at the end – it’s definitely worth it!
Ah don’t beat yourself up – it’s such a personal decision, and in some ways it makes sense to spend time and energy on preparing for other parts of the day too. Thanks for reading!
Wow, I’m blown away!
Thanks Deirdre – and thanks for reading!
Still reading! I can’t wait to see it all come together.
Great! Thanks Rachel :) Final pictures will be up soon…
very beautiful – you’re so talented!
Thank you Kathryn! You are too kind :)
wow – beautiful work! i know we have talked about the before but your hand stitching is amazing!
Thanks – I must admit I am getting more into hand sewing and embroidery, which I never expected! It’s so satisfying.
This is exquisite! Do you mind my asking where you learnt all these incredible skills?? x
Thank you, Nina! I did the goldwork course on Mastered.com which was a great primer – I am actually the student being filmed for the video course :) The rest I learned from other people’s blogs and Google!
Beautiful work, but the suspense is killing me!
Ha! Thanks Claire, the big reveal is set for a few days’ time…
Well now I know how to create something amazing!
Yup – dedicate seemingly hundreds of hours to it ;-) Thanks for reading, I appreciate your support.
I want to see the finished pictures!
I’m in awe of your incredible skills and talent. You have put so many hours of thought and work into this. It must be so satisfying to see it all coming together. Can’t wait for the reveal
Thanks Heather, it certainly was very satisfying to see it all finished. I can’t wait to show you!
I’m really looking forward to the big reveal! I absolutely love your veil, so much thought and exquisite work went into it all. It’s incredibly beautiful.
Thank you Chris, I was really pleased with it!
I am so thrilled to read about you thought process and vision. What a beautiful dress and veil. Wish you all the best on your big day.
Thank you very much, I’m so glad you’ve enjoyed reading.
Wow! Very beautiful, and such detailed work! I’m happy I am catching every step along the way!
Thank you Linda, I loved working on it!
Beautiful work! You have created an instant (ok _not_ so instant, but you know what I mean!) heirloom!
If you have babes sometime in the future, you need to embroider these stars on the little ones first blanket or outfit. <3
Thank you :) This one is definitely going in the loft for future generations of refashioners!